
••••••••••••••
Add-on Sketch #13

You can download and print this sketch by clicking on the add-on sketches link found under the "printable sketches" tab on the right sidebar.
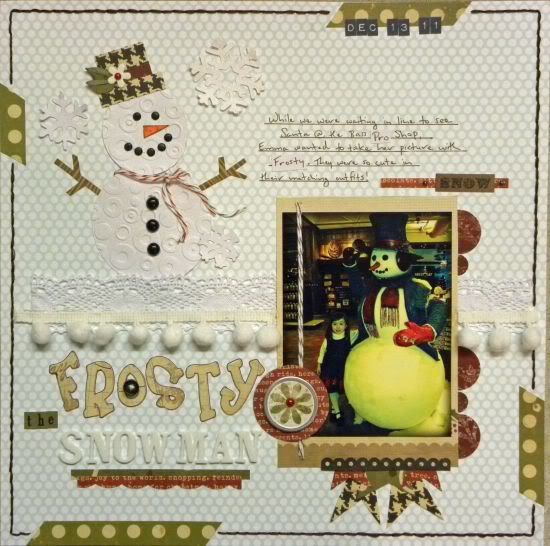
"Frosty the Snowman" by Ashley Horton
Supply List - Patterned Paper: Jillibean Soup and Simple Stories; Shimmer Spritz: Tsukineko; Font: Frosty and Impact Label; Punch: Marvy; Ribbon: The Paper Studio; Pom Pom Trim: Wright's; Baker's Twine: The Twinery; Pearls: Kaiser Craft; Tag: EK Success; Mini Round Gems: Recollections; Embroidery Floss: Janlynn; Embossing: Sizzix Big Shot and Provo Craft; Brads: The Paper Studio; Stickers: Simple Stories; Thickers: American Crafts
Variation #1 - I added some Dry Embossing to the body and head of the Snowman to add a little texture.
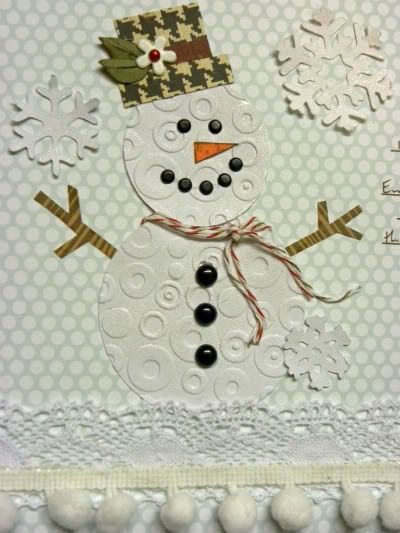
Variation #2 - I sprayed the two circles with Shimmer Glitz to give the look of snow.
Variation #3 - I mixed brown and red Baker's Twine to create the scarf.
Variation #4 - To dress up the look of the hat, I added a white flower brad and attached a pearl to the center. I also fussy cut two leaves to go behind the flower.
Variation #5 - I lightly drew the Snowman's "smile" and added brads for the mouth and two for the eyes.

• • • • • • • • • • • • • • • • • • • • • • • • • • • • • •
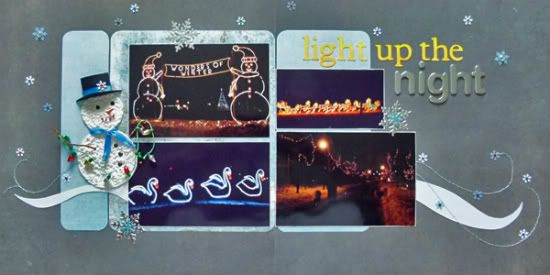
"Light Up the Night" by Michele Edwards
Supplies - Cardstock: Bazzill, BoBunny; Patterned Paper: KaiserCraft, BoBunny; Embellishments: Snowflakes cut with die-namics and fiskars punch, marvy liquid applique, glamour dust, Offray ribbon, Queen and Company rhinestones, unknown frosty-blue and silver snowflake brads, unknown string of lights; Alphabets: Cricut (Plantin Schoolbook), American Crafts Thickers; Ink: Copic Markers, Colorbox; Floss: DMC; Sketch: Sketches for Scrapbooking, Volume 6
I am so in love with my snowman, he's too-cute! I used him to embellish a layout using pictures of Christmas lights in our local park. I started with a sketch from Sketches for Scrapbooking, Volume
6.
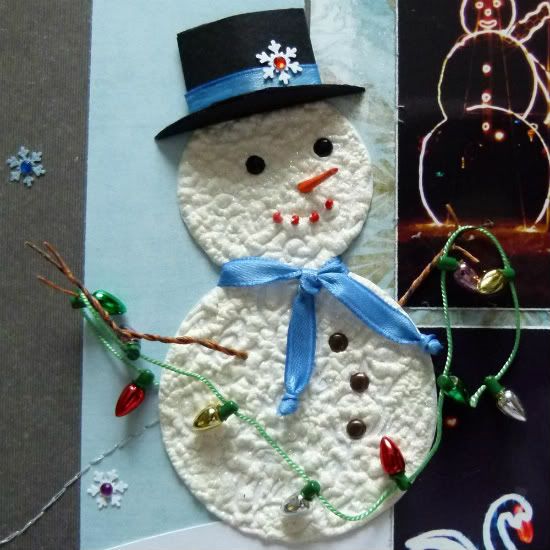
Snowman Variations
1. I covered the snowman's body with the liquid applique, using a swirling motion. Then I sprinkled a thin dusting of glamour dust over the liquid applique before it dried.
2. I used brads for the snowman's eyes and also for his buttons, rolled up orange cardstock for his nose and red seed beads for his mouth. Using two shades of brown floss and a generous helping of white
glue, I twisted the floss to create twigs for his arms.
3. I used ribbon for his scarf and put a band of ribbon around his hat. I coloured the ribbon using my copic markers.
4. To further the theme of the layout, I draped a string of Christmas lights over his arms.
••••••••••••••••••••••••
8 comments:
These layouts are making me wish for snow!!!
Ashley - Amazing layout. I love the white on white. Your snowman is breathtaking. The embossing and herringbone hat with the tiny details are perfect.
Michele - Beautiful layout. I like how you used a dark background to make it feel like a nighttime layout. Love the texture on your snowman too.
WOW WOW WOW!! I love that you both made your snowmen. How cool they both came out. Great layouts!!
Michelle, I love that cool effect on your snowman!! It really makes him look snow-y!! :) And I love your layout!!
Love both LO's. Love all the details and lights on Michele's.
Let it snow, let it snow!
Fabulous snowmen Ashley and Michelle. Love the embossing, and love the icing!
Lovin' the textured snowmen ladies!!!
The texture you both added to your snowmen is really cool! Beautiful work, ladies!!
Michele, your snowman is fantastic. Brilliant idea for the twig arms!
Post a Comment