
It's Guest Designer, Michelle McClure's turn to show you how she used the one-page sketch. She also shows some great ideas and tips when working on travel albums.
One-page Sketch #2

You can download and print this sketch by clicking on the one-page sketches link found under the "printable sketches" tab on the right sidebar.
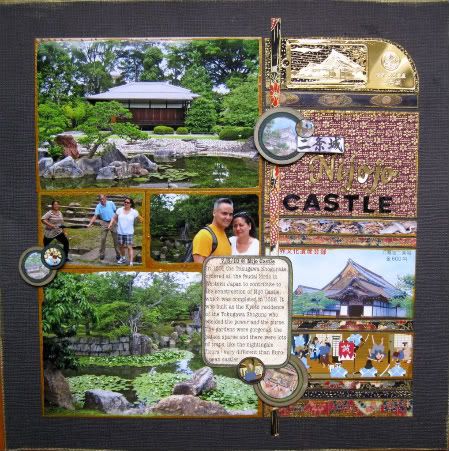
"Nijo Castle" by Michelle McClure
Supplies Used: Cardstock: Bazzill; Ink: Staz-on Metallic Gold; Circle Punches: EK Success; Cardstock scraps and souvenirs
Pre-Process:
Whenever I have an event that produces hundreds of photos, like an once in a lifetime 10 day trip to Kyoto, Japan, I get overwhelmed by the thought of scrapping such a large ordeal. To make it more manageable, I printed all the photos in 4 x 6 through Shutterfly (with coupon codes) so I didn't have to decide between the various sizes for each photo. Then I organized the photos, brochures, souvenirs, embellishments into ziplock baggies with a post-it note labeled by each day with the attractions viewed on that day.
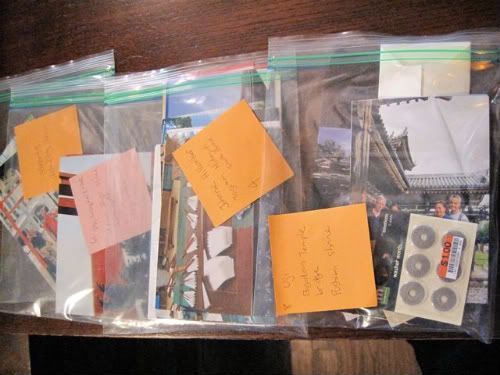
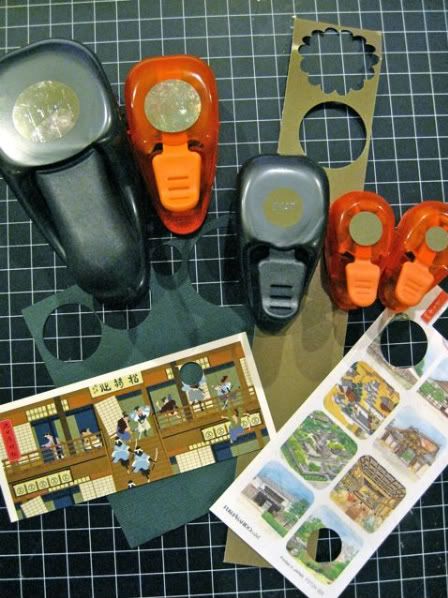
Here is a sample of what is in one baggie:
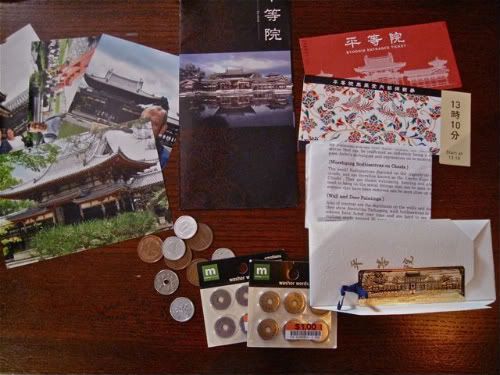
This shows the photos, brochure, entrance tickets, bookmark, coins and embellishments that match this one day. Then I just have to grab a baggie, pick some background cardstock and papers and I'm ready to go. It made it less overwhelming to break a big trip into manageable chunks. Also, I didn't have to dig through a big pile of photos and memorabilia when I wanted to scrap just one page, especially after awhile I couldn't remember all the place names in Japanese. It was much fresher in my mind to organize everything right after the trip.
The Process:
I chose my Japan trip because the strips on the sketch reminded me of the Japanese handmade washi papers. For this layout, I kept to the sketch a lot more than my other projects, why fix what isn't broken? Also, in terms of supplies, I basically just used one piece of cardstock for the background. The rest of the items were scraps and souvenirs from the trip. So this was a quick and painless layout to do, except for measuring and lining up the tower of strips, which I will get to shortly.
Variation #1: I inked the photo edges with a thick coat of metallic gold Staz-on ink to give it a matted look. It gave the photos a bright border to separate the dark photos from the dark background. I thought the metallic ink gave the photos more of an Asian look since the Japanese papers and bookmark also used metallic gold. I kept the photos the same size as in the sketch since my photos were printed all in 4 x 6" and it would have been difficult to trim numerous photos while maintaining the integrity of the scene. I only had to crop two photos which focused on the people, and I kept the larger two photos the same size so it showed the garden scene.
Variation #2: I switched the photos and strips placement, mirror image of the sketch, because the bookmark had a curved upper edge. It looked better if it was on the edge of the page rather than curving towards the center of the page.
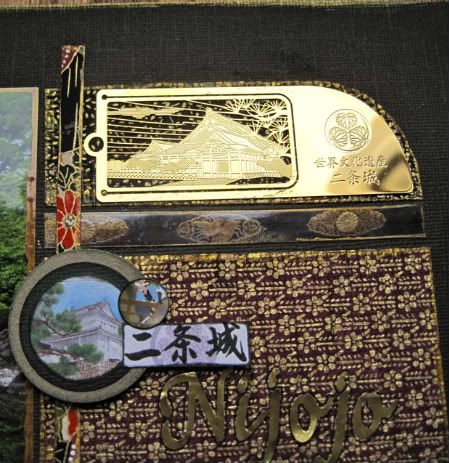
Variation #3: Instead of patterned papers, I used things I collected on the trip with scrapbooking in mind. The strips are composed of a metal bookmark, washi papers, cropped photos, the entrance ticket to the palace and a cropped postcard.

This shows the photos, brochure, entrance tickets, bookmark, coins and embellishments that match this one day. Then I just have to grab a baggie, pick some background cardstock and papers and I'm ready to go. It made it less overwhelming to break a big trip into manageable chunks. Also, I didn't have to dig through a big pile of photos and memorabilia when I wanted to scrap just one page, especially after awhile I couldn't remember all the place names in Japanese. It was much fresher in my mind to organize everything right after the trip.
The Process:
I chose my Japan trip because the strips on the sketch reminded me of the Japanese handmade washi papers. For this layout, I kept to the sketch a lot more than my other projects, why fix what isn't broken? Also, in terms of supplies, I basically just used one piece of cardstock for the background. The rest of the items were scraps and souvenirs from the trip. So this was a quick and painless layout to do, except for measuring and lining up the tower of strips, which I will get to shortly.
Variation #1: I inked the photo edges with a thick coat of metallic gold Staz-on ink to give it a matted look. It gave the photos a bright border to separate the dark photos from the dark background. I thought the metallic ink gave the photos more of an Asian look since the Japanese papers and bookmark also used metallic gold. I kept the photos the same size as in the sketch since my photos were printed all in 4 x 6" and it would have been difficult to trim numerous photos while maintaining the integrity of the scene. I only had to crop two photos which focused on the people, and I kept the larger two photos the same size so it showed the garden scene.
Variation #2: I switched the photos and strips placement, mirror image of the sketch, because the bookmark had a curved upper edge. It looked better if it was on the edge of the page rather than curving towards the center of the page.
Variation #3: Instead of patterned papers, I used things I collected on the trip with scrapbooking in mind. The strips are composed of a metal bookmark, washi papers, cropped photos, the entrance ticket to the palace and a cropped postcard.
Variation #4: I tried cutting the strips according to the stated measurements, but it wasn't lining up correctly. I just started lining them up by eye, I threw out some strips, or recut some bigger or smaller until it stacked up correctly. The washi papers would stretch once I put adhesive on the back since it is like wrinkly crepe paper, so there was a lot of adjusting. I couldn't tell you what measurements I ended up with but it did work out in the end.
Variation #5: I know Allison likes that striped strip to unify the colors on the page, but I couldn't find any striped washi paper while I was in Japan. The most popular theme was floral, then birds and fans. So I used a vertical strip with the colors on the page, but it wasn't a striped piece. Sorry, I did try.
Variation #6: Instead of the star embellishments, I used my circle punches and punched out pictures from stickers of the site and a postcard that matched the scene. Nijo Castle was built for the shoguns as opposed to the emperor, so that is why I put in the samurais and why we are stabbing each other with umbrellas.
Thanks for letting me guest design this month and for reading to the bitter end. Here is the site showing the other pages: Kyoto, Japan July 2010 Album
TFL! I hope I was helpful.
••••••••••••••••••••••••••••••••••••••••••••••
20 comments:
Beautiful page! Thank you for the details!
I love this page and your ideas are great. My favorite thing is to scrap the pieces of paper items we collect on our trips. Thank you for sharing your ideas and showing us how you made this fun layout.
Thank you for sharing and all the details. I love the bookmark and I love how you organized this once in a lifetime opportunity.
Thanks for sharing how you organize trips. I get overwhelmed!
Great tips for organizing photos after a big event or trip!
STUNNING LO!
I love that you have your ephemera and everything all packaged up together!
Great work and description!
Terrific tips for organization! I always wonder what I should do with all those ticket stubs and small stuff! Thank goodness for Shutterfly coupons!! Love these layouts.
Great layout and great tips too! Thanks!
I love your LO. Thanks for sharing your tips on organizing an album like this. It can get overwhelming for me to put together an album from a trip. So many photos!
I also want to thank you for sharing your ideas and tips on organizing a travel album. I also commented on your 2 Peas gallery. I am trying to finish up a travel album for a Sicily trip in 2009! This will really help. Also, we are leaving for a trip to Vietnam in February and this will definitely help me to organize this too. These travel moments are so special. They help me to relive the trip and preserve all the stories that inevitably occur. Love your layouts and so happy to see this post.
So many good tips. And a beautiful layout.
Wow, really love this layout!
Nice idea for using the circle punches from the postcard pictures. Thanks for sharing.
great layouts and thanks for sharing your process, those are some awesome tips.
Great ideas. Thanks!
The organizing tips are invaluable - thanks so much for sharing them. I have two large trips that I'm off to organize.........
Love the idea of grouping everything in baggies to keep it more manageable! TFS :O)
Awesome layout!
Great layout. Love all the patterns you found on your trip.
I used this sketch tonight. I had to change a few things but the bones are there.
http://crystalscraftycreations.blogspot.com/2011/03/sowing-seeds-of-silliness-counterfeit.html
Post a Comment