
One-page sketch #3
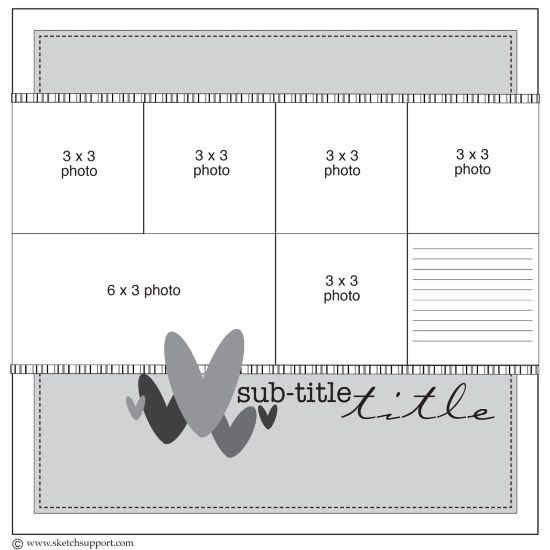
You can download and print this sketch by clicking on the one-page sketches link found under the "printable sketches" tab on the right sidebar.
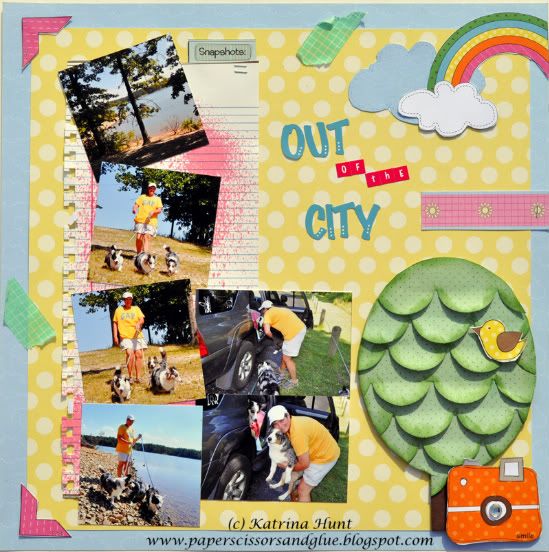
"Out of the City" by Katrina Hunt
Supplies - Pattern Paper: Nikki Sivils, Scrapbooker (Summer Collection); Chipboard tree: Nikki Sivils Scrapbooker; Letter Stickers: Nikki Sivils Scrapbooker (Summer Sticker Page); Ink: Memento Ink; Punch: EK Success; Stapler: Tim Holtz Tiny Attacher; Mist: Smooch Spritz; Washi Tape: American Crafts; Adhesive: Scotch ATG and Fabri Tac
I rotated the sketch and put the smaller pictures at angles down the page. I also took and used two bigger pictures for the bottom row on the sketch.
Instead of the hearts, I used a chipboard shaped tree. I used the edges of Nikki’s die cut paper and layered the scallops. I then “fluffed” them up to give them dimension.
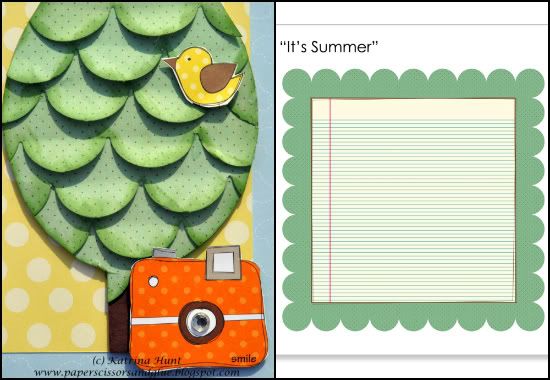
Then I added a bird, the tree was a little lonely! And I loved the camera so I just included it at the bottom.
• • • • • • • • • • • • • • • • • • • • • • • • • • • • • • • • • • • • • • • • • • • • •

"Suzy Homemaker" by Jill Sarginson
Supply list - Cardstock: Bazzill, DCWV; Pattern paper: October Afternoon (Modern Homemaker); Alphabets: Thickers; Ink: Versamark; Rub-ons: Forever In Time; Tools: Marvy Uchida circle punch, Close to My Heart edge distresser, Bazzill In Stitz'z circle template, Fiskars Scallop Sentiment border punch, Creative Memories circle cutters; Floss: DMC; Journaling: Computer-generated (font: Ariel); Brads: Forever In Time
Variations:
1. I rotated this sketch to fit my photos and I printed my photos at a smaller size. As a result, these do not span across the entire layout.
2. I opted to use journaling strips and mount them on a circle vs. having a square journal box.
3. Again, I opted to use a circle to mount my title and then cut out embellishments from the pattern paper and mini circles to add to this area. I wanted to make it stand out.
4. I used two square layers underneath the photos vs one layer. And in addition, I used several small border pieces on the side of my photos vs. one layer.
5. I added one additional circle (on the left side of the page) to balance out the layout.
• • • • • • • • • • • • • • • • • • • • • • • • • • • • • • • • • • • • • • • • • • • • •

"Train Ride" by Christy Arthur
Cardstock: Bazzill Kraft Cardstock and In stitch'z Floss and Needles Red/Orange; Patterned paper: October Afternoon (Modern Homemaker Party Line, Report Card Story Hour), Jillibean Soup (Pasta Fagioli, and BasicGrey (Wander); Stickers: October Afternoon ( Thrift Shop Word Stickers and Mini Market Cream and Red Stickers) and Studio Calico (Elementary Die Cut Stickers); Journal cards: October Afternoon; Die Cut shapes: BasicGrey (Wander); Alphabet: Jenni Bowlin Bingo Alphabets; Tools: Tim Holtz Tiny Attacher and We R Memory Keepers Crop-a-dile Corner Chomper; Ink: Colorbox; Mist: Studio Calico (Dark Calico); Pen: American Crafts; Ribbon: Hobby Lobby
I have several pictures of a very special train ride that we rode on Halloween morning this past October. I decided to separate the photos and group those that were just the train ride and use the other photos that were more "Halloween" specific on a different layout. This is the layout with just the train pictures. Since I did not have six photos like the sketch, I used the three photos that I did have and centered them in the layout. Here are some other variations to the sketch:
• I rounded the top corners on the yellow background patterned paper, which is different from the sketch.
• I tucked a journaling card behind the yellow patterned paper to tell more of the story of the day. I added a "memories" tab to allow easy access to the card.
• I added three vertical paper strips on the left side of the layout, which is different than the sketch. I like the color that it brings to the layout.
• I added a larger strip of patterned paper behind the photos, which is different than the narrow striped paper in the sketch.
• I added drops of mist around the page. I also misted into the lid of the mist to make the circle details.
• I added a ruffle of ribbon under the photos instead of the heart embellishment in the sketch.
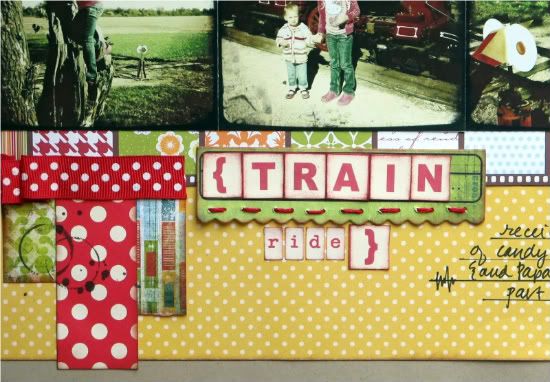
• I added stitching detail to the bottom right of the page and under the "train" portion of the title to give a little punch to the layout.
• I mounted my "train" portion of the title onto a die cut sticker to give it a little more emphasis.
• I added hand journaling around the page, instead of using a journaling
10 comments:
I love love these layouts. The first one is awesome, the bright happy colors, the photo collage, the tree is so cool, everything came out great. The second love the photo collage again, the colors and the theme, great job. The last one is cool too, love the JB paper.
Love these pages!
Gorgeous takes. I love the homemade tree! How smart!
Great work ladies! love the flipped sketches too!
:)
Great layouts! I'm working on mine now and flipped it! :-)
Love all the layers on the layouts today.
Great stuff ladies!
Posting a link on my blog to you guys right now with my take on this sketch - love everything you have going on here! Thanks!
Thanks for the great sketch! I created a layout using it. You can check it out at my blog: http://dream-bielieve-imagine-mustangkayla.blogspot.com/2011/02/cosmo-cricket-lil-manlayout.html
Kristy, your style is awesome. I so wish I could duplicate it on all of my layouts!!!
(Great sketches don't hurt either)
Post a Comment