
One thing I love about background pieces on a sketch, like the big circle, is that you can redesign them to fit your style and your page. Since it's strictly a background and nothing on the page really relies on it, you have so many options to play around with it. Use it to incorporate the theme of your page into the design or use a group of smaller shapes to make up one big background. You could even remove it for a cleaner, more simple look.
The layouts today show four different ways to play around with that background piece to completely change the look of the sketch.
Two-page Sketch #8
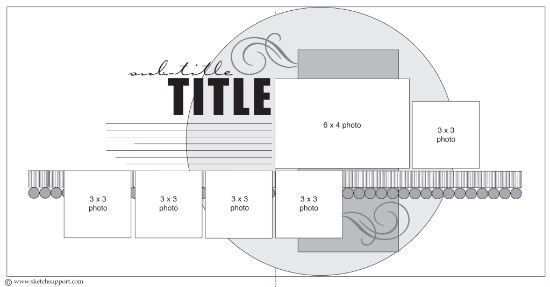
You can download and print this sketch by clicking on the two-page sketches link found under the "printable sketches" tab on the right sidebar.

"Extreme Golf" by Carolyn Wolff
Supply List - All pattern papers: BasicGrey; Stickers: Karen Foster; Brads: BasicGrey; Chipboard letters: Kaisercraft; Glimmer Mist: Tattered Angels; Stitching templates: Bazzill; Embroidery Floss: Bazzill
I stuck to the basic outline of the sketch. I left the photo placement the same and I created a photo mat for each of them.
Variation #1 – For the circle element on the sketch I chose to use different size and different colour brads. I was really happy with the effect that this had to highlight the main area of my layout. However, I did find that it did not break up the background paper and I found it a bit of a challenge to achieve the look I wanted.
Variation #2 – Instead of flourishes I used some themed stickers to pull everything together.
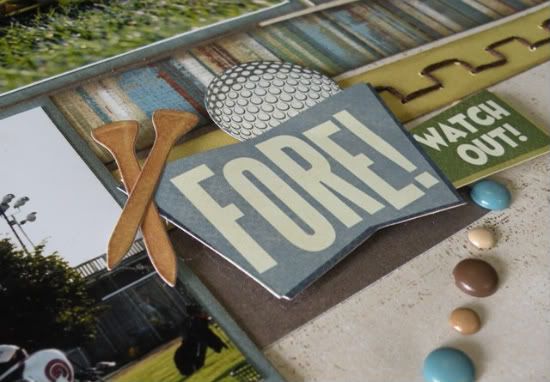
I popped the stickers up using foam adhesive and arranged them in clusters to create focal points on my layout.
Variation #3 – I love the circle border that is shown in the sketch, but I felt with all the circle brads, it might be a bit much. I chose to stitch a border on top of a solid coloured strip to create some more dimension and interest. I think it sort of pulls your eye away from the large circle on the page as well.
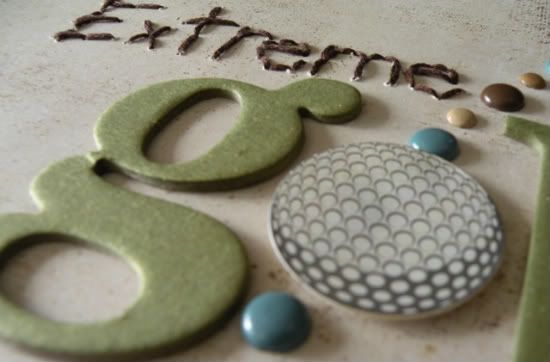
Variation #4 – I really wanted to create the boldness in the title on my page as it was shown in the sketch. I chose to use chipboard letters and mist them to match my layout. I used a stitching template to stitch the ‘extreme’ part of my title. I even worked in a golf ball sticker to replace the letter ‘o’ in golf.
This visit to the driving range was a very regular occurrence for us so I didn’t feel like I need to journal on this particular page. Journaling could easily be worked in on the left side of the title or on the top of page 2, next to the stickers.
• • • • • • • • • • • • • • • • • • • • • • • • • • • • • • • • • • • • • • • • • • • • •
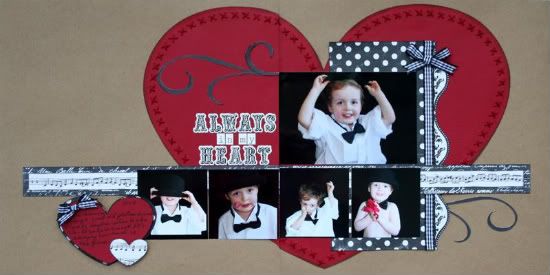
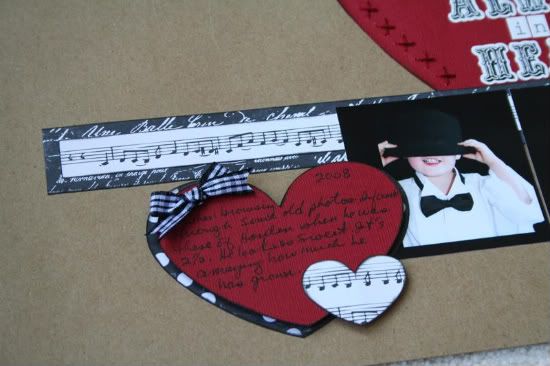
"Always in my Heart" by Shari Thurman
Supplies - Pattern paper and alphabet stickers: Echo Park; Tools: We R Memory Keepers Sew Easy and Cricut- Wild Card(florish) and Plantin Schoolbook(hearts); Adhesive: Thermo-web 3D; Embroidery floss: DMC; Other: Cardstock and ribbon
I fell in love with this month's two-page sketch. When I saw the huge circle I immediately knew that I wanted to try to create a huge Valentine with pictures of my son.
• I used my Cricut Design Studio to stretch the heart to 16 x 11.5 inches. Using my Sew Easy tool, I scored around the edges of the heart and then hand stitched with embroidery floss.
• I placed my rectangle polka dot paper to the right as suggested in the sketch and layered it with a curvy pattern paper and gingham ribbon.
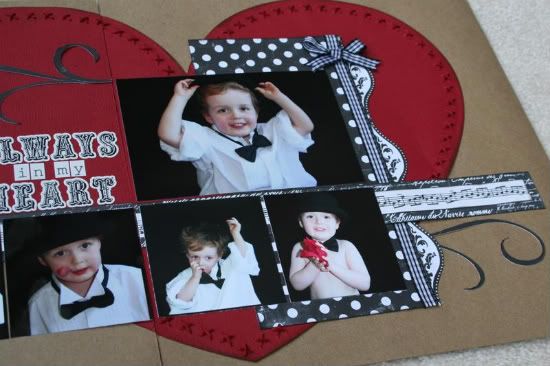
I moved the smaller photo on the right and positioned it below the 4 x 6 photo. I did this because I didn't want to cover up the pretty curvy paper and ribbon.
• I slightly adjusted the placement of flourish element to accommodate the previous change. The 2 long strips are 1/2 inch and 1 inch.
• I moved the title down a bit and replaced the small photo on the left with an embellished heart journaling spot.
• • • • • • • • • • • • • • • • • • • • • • • • • • • • • • • • • • • • • • • • • • • • •
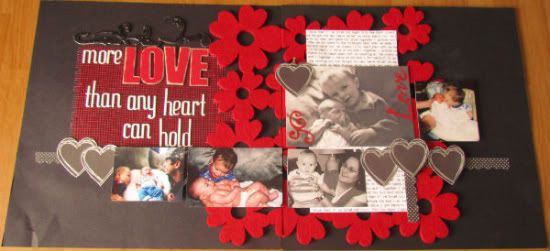
"More Love Than Any Heart Can Hold" by Amy Roller
Supplies - Cardstock: Bazzill, Felt background: Dollar Store; Patterned paper: Little Yellow Bicycle, Making Memories, and KI Memories; Metal clip: Stampin up!; Flourish: Cosmo Cricket; Alphabets: Pink Paislee and American Crafts; Glitter: Stampin Up!; Other: Mesh, transparency
On this sketch I had a large felt background I wanted to use but it was square instead of a circle as the sketch suggests so I had to make several changes.
Variation #1: Of course, the background shape and size are different by going with the felt flowers. I tried to keep the rectangle piece the same measurement as well as the 4 x 6 picture and small one next to it. The 4 x 6 picture has a "LOVE" transparency over it. It and a heart are attached with a small clip. All of the other photos are different sizes than the sketch lists. I kind of went with what I had and how I needed to crop them so that I wouldn't lose anything important. This also changed the number of pictures I used, only 5 instead of 6. Most of them were popped up as well because of the depth of the felt background.
Variation #2: I left out the striped strip because I didn't have one that coordinated well with the felt. Instead I just went with the circle theme of the decorative strip and used a small dot pattern strip that I punched a scallop border across. I then cut out hearts from a large pattern and traced the lines on it with a silver pen so that it would show up better against the black.

These were originally going to fill in for my stripe but I decided they covered up to much of the dots, and so they became extra accents following the same line across the page. They also form a visual triangle throughout the page with the one attached to the picture above.
Variation #3: The next small change I made was adding a small dotted strip vertically in the bottom right of the page instead of using a swirl or flourish because I felt it would get lost in the background.
Variation #4: I added a mesh background to the journaling area and frayed out the edges for added detail and then adhered the title to it.
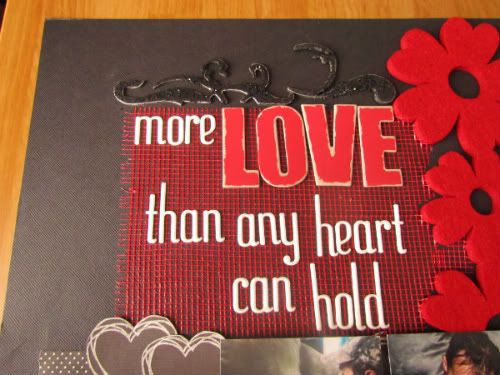
Above that I added a flourish which I covered with black chunky glitter so that it would stand out against the black background.
• • • • • • • • • • • • • • • • • • • • • • • • • • • • • • • • • • • • • • • • • • • • •
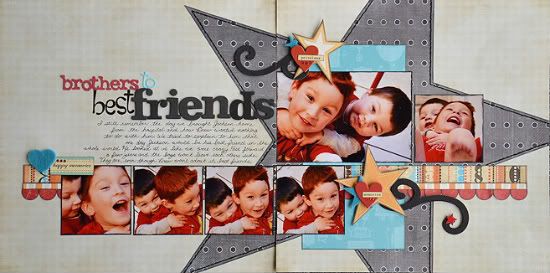
"Brothers to Best Friends" by Allison Davis
Supply list - Cardstock: Bazzill; Patterned paper: Fancy Pants (black dots), My Mind's Eye (blue robots); Sassafras Lass (both stripes); and Pink Paislee (red); Chipboard flourishes: Fancy Pants; Stars: unknown; Felt: Fancy Pants (blue heart and stars); Chipboard hearts: unknown; Stickers: October Afternoon; Alphabets: Prima (brothers), Doodlebug Designs (to, best), and American Crafts (friends); Jewels: Kaisercraft; Paint: Ranger; Embroidery floss: DMC; Template; The Crafter's Workshop
Variation #1: The biggest change I made to the sketch on my layout is the large star in place of the circle. I used a template from The Crafter's Workshop as the starting point for my star. The template had a pretty big star but I wanted mine to stretch across both pages and extend off a few of the sides.
I started by tracing the star from the template, slanted in the direction I wanted it, onto a 12 x 12" piece of cardstock. To make it bigger I used a ruler to draw the lines about 2" out from the lines of the star made with the template. After I cut it out, this created my own template for the star on the right page of my layout.
For the star points that extended onto the left page I made them on another piece of cardstock using the left edge of the unfinished star points as my guide. I placed the ruler along the edge and drew a line extending past the unfinished point. After you do this on both edges, the two lines with come together at a point, creating the finished point for the left page.
The last step was to use my own star template to trace the shape on the patterned paper. You could bypass making your own template on cardstock and just make the shape directly on the patterned paper. I, personally, like to make templates of things like this so I can use them over and over again.
Variation #2 - I added a second smaller striped strip to the other strips. No reason other than I like the way it looked.
Variation #3 - I wanted to use colors and elements on this page that were both love themed and very boyish at the same time. I decided to use both hearts and stars to accent the chipboard flourishes by layering chipboard and felt hearts and stars at the ends of both. I also added a small felt heart on the left edge of the strips and pictures.
•••••••••••••••••••••••••••••••••••••
20 comments:
I love that big star and the circle of brads too.
I love all the unique backgrounds! Great job ladies! Love the mesh to ground the title!
Great layouts with some fun techniques! Love the stitching and the brad circle!
I love the brads and all the die cuts used on these layouts. Everyone oudid themselves again. Loved them all.
Excellent job on the layouts ladies. I love all of them!
Wow! you ladies really rocked this sketch. Each one I thought was going to be the BEST and I moved on to the next to find it too was fabulous and then the next and the next!
GREAT WORK!! and TFS!
Oh my gosh ... I LOVE these ladies!
Carolyn - I love your use of brads and the great theme/pics!! Awesome layout!
Shari - the heart is awesome! super cute pics too!!
Amy - the die-cut background is very neat!! great take on the sketch!!
Allison - you have such a way with your sketches! Love this and now I wanna do one of Abba and her best friend! :)
These are so great!! What amazing variations and great ideas! :)
love all the LO's. Really like the idea with the brads.
OMG! Those LUCKY 8 PUNCHES are FREAK"N AWESOME!!!! I clicked on the line you gave and OMG! Those are so cool (and they look EASY too! BONUS) Can't wait til they come out! Thanks for sharing.
I love two page layout week at Sketch Support!
great pages all... love them all!
I love the brad circle outline, heart and the giant star for the background pieces. Awesomeness!
You guys out did yourselves today! Simply amazing examples of ways to alter the background on a sketch. I LOVE them all. Thanks for sharing you fabulous ideas!!
I am amazed every day at the great ideas and what you are all doing with the sketches!! It's my favorite site to check every morning!!
Allison - Are you using all unpublished sketches for this site or do you sometimes pull from one of your books? If you pull from your books, would you be able to include the Volume #? I loved your Sketch Support class I took last fall and this new website is the absolute best!! Thanks so much for you and your crew for all the great inspiration!
All of the sketches on Sketch Support are new and unpublished. :)
Allison...I am trying to find the star template at The Crafter's Workshop, I cannot find it. Can you tell me where you bought it from? I would love to get one.
THANKS
gosh, these layouts keep getting more awesome every time I check em out! Gorgeous work all!
Again...fabulous layouts!
Post a Comment