
Take a look at these pages from our Creative Team and how they used these borders on their pages.

"Persist" by Carolyn Wolff
On this layout I used red floss to create a zig-zag pattern along the edge of the striped pattern paper and I also used red floss to create a straight line of stitching that followed the edge of the die-cut. It is a great way to make your die-cut backgrounds stand out.


• • • • • • • • • • • • • • • • • • • • • • • • • • • • • •

"You Are Unbelievable" by Carolyn Wolff
On this layout I added a straight line of brown stitching around the edge of the striped pattern paper. I created another layer and defined this paper on my background.

• • • • • • • • • • • • • • • • • • • • • • • • • • • • • •

"The Best of Times" by Robbie Herring
Supplies Used - Bo Bunny Timepiece Collection paper, chipboard, stickers, trinkets, brads and wraps.
Sometimes, you might want to get the look of stitching or to add a bit more detail to a page but not want to spend quite as much time as it would take stitching all the way around. If you take a closer look at the border of this page, you will notice that I didn't stitch all the way around. I simply put a stitch at the corners and then pulled my thread across the page for a really LONG stitch.

With this technique, I prefer to use all 6 strand of the floss. Another thing good about this technique is that it is easily added when the page is finished or mostly finished. Notice that I just stopped the stitches near the embellishments instead of completing the border all the way around.

• • • • • • • • • • • • • • • • • • • • • • • • • • • • • •

"My Guy" by Jill Sarginson
Supplies Used - Cardstock: Bazzill Basics; Patterned Paper: Pink Paislee; Floss: Anchor; Letters: My Little Shoebox, Thickers; Paint: American Crafts; Tools: Creative Memories heart punch, Creative Memories circle cutting system, Fiskars Scallop Sentiment border punch; Pen: zig pen
This layout was created with three areas. In order to add some cohesiveness across all the sections, I decided to add some stitching. To add variety, I stitched in both horizontal and vertical lines as well as single lines and double lines. I used the Bazzill Basics In Stitch'z Cardstock Stitching Template 8x8 Circles template (it comes with a line stitch) as a guide for piercing my holes.
• • • • • • • • • • • • • • • • • • • • • • • • • • • • • •

"Super Hero" by Christy Arthur
• • • • • • • • • • • • • • • • • • • • • • • • • • • • • •

"Give Me a Popsicle Please" by Allison Davis
Supplies - Cardstock: Bazzill; Patterned papers: My Mind's Eye; Alphabets: Prima Marketing Inc. (give me a, please) and BasicGrey (popsicle); Jewel flourish: Prima Marketing Inc.; Stickers: My Mind's Eye; Embroidery floss: DMC
I added a wavy, single stitched line across the striped strip on my page to add more interest. I hand drew my wavy line but if you are a little leery of doing that, the BoBunny Flex Ruler would be perfect for it!
• • • • • • • • • • • • • • • • • • • • • • • • • • • • • •

"Brothers to Best Buds" by Allison Davis
Supplies - Cardstock: Bazzill; Patterned paper: My Mind's Eye; Alphabet: My Mind's Eye; Die Cut title and brother ticket: My Mind's Eye; Tickets: Jenni Bowlin; Star stickers: Jenni Bowlin
On this layout I used two and three lines of stitching to help frame the photos on the layout. At the end of a few lines I added a small star sticker with a brad in the center. On one of the horizontal stitched lines I added small vertical lines over the top.
• • • • • • • • • • • • • • • • • • • • • • • • • • • • • •
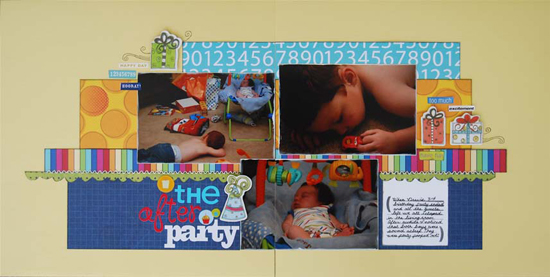
"The After Party" by Allison Davis
Supplies - Cardstock: Bazzill; Patterned paper: Scenic Route; Alphabets: Doodlebug; Party sticker: unknown; Chipboard embellishments: Me and My Big Ideas; Word stickers: Scenic Route and 7Gypsies
I added a zig zag stitch to the seam of the striped strip and the green scallop strip across the center of the layout. I wanted to get a little bit of white in there to help break up the bold colors. Plus, I love the look of zig zag stitching to the seam of papers!
To create a zig zag stitch by hand I start by lightly drawing two lines side by side with a little bit of space between them. I pierce the holes on one line with my piercing ruler. Then when I pierce the holes on the second line, I move the piercing ruler so that the holes will line up with the center of the space between the holes on the first line.
Here's a little overview of the stitching on each of the layouts today:
• Add a zig zag stitch to the edge of paper for interest.
• Using stitching around a die cut paper background is great for helping it to stand out.
• A simple border of stitching on patterned paper is a great way to define the edges.
• To save time, use long stitches.
• Combine horizontal and vertical lines of stitching.
• Try using double lines of stitching for a bolder look.
• Use small slanted lines on the edges of paper.
• Add a wavy, single stitched line across a strip of patterned paper.
• Use stitched lines to frame a grouping of photos.
• Add a zig zag stitch to the seam of two patterned papers.
If you are new to stitching, check out this post about how to get started.
••••••••••••••••••••••••••••••••••••
2 comments:
These are all totally awesome ladies. I love each and every one of these and feel happy just seeing all the stitching going on. Great job ladies. Allison, so nice to see an old favorite layout of yours. Can't wait to see the rest of the week unfold with all the stitching going on.
Thanks for sharing these tips and the link!
Post a Comment