
Today we've got four more different interpretations of the card sketch. I always love seeing how each individual looks at the same sketch and comes up with something completely unique and special.
Card Sketch #3
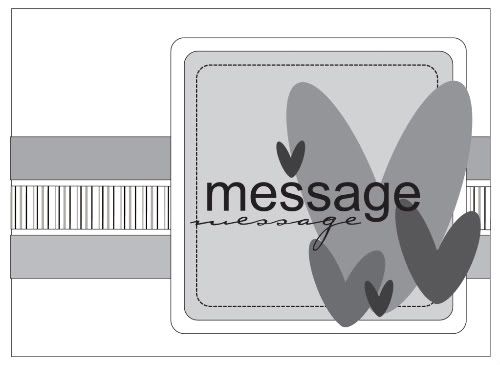
You can download and print this sketch by clicking on the card sketches link found under the "printable sketches" tab on the right sidebar.
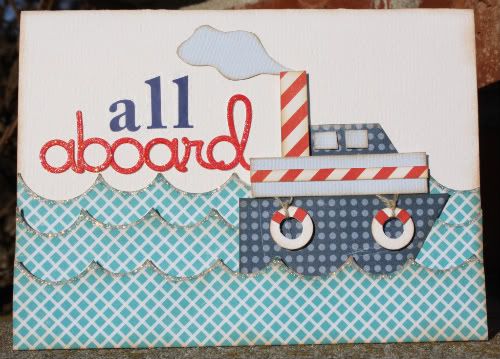
“All Aboard" card by Christina Hoffman
Supply list – Cardstock: Bazzill; Patterned paper: Echo Park; Alphabets: “all” unknown, “aboard” Doodlebug Designs; Ink: Colorbox Fluid Chalk Ink (Creamy Brown); Glitter accent: Stickles; Floss: DMC; Twine: Unknown; Tools: EK Success Circle Punches
Variation #1 – Instead of using the strips in the middle of the page like the sketch suggested I opted to move them down to look like water. I then used a ½ inch and a ¾ inch circle punch to punch different sized half circles to appear as the actual waves. To give it depth I pop-dotted each layer of water then chalked around all of the edges and added Stickles to them.
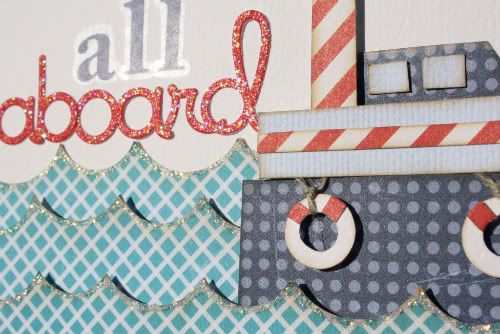
Variation #2 – I also opted to turn the different sized squares into a boat. To cut the boat I just started tracing my ruler until I got the shape I was looking for. I then chalked around all of the edges and pop-dotted it again to give it depth.
• • • • • • • • • • • • • • • • • • • • • • • • • • • • • • • • • • • • • • • • • • • • •
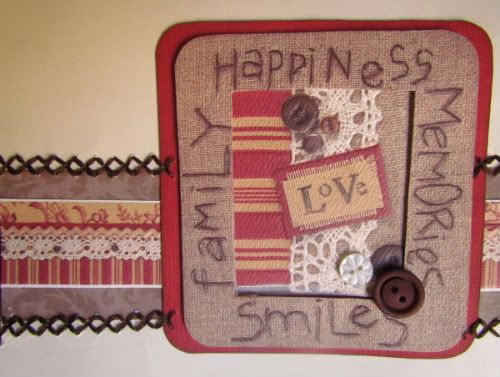
"Love" card by Amy Roller
Supplies - Cardstock: Stampin UP!; Embossed page elements: We R Memory Keepers; Other:
Buttons, Thread
For this Card Sketch I had the perfect Diecut paper I wanted to use. I used the embossed diecut element for the smaller square which I popped up off the large cardstock square.

I added buttons to this for a 3D effect. I then used a layered strip of patterns and lace to make the stripe section and added brown stitching that somewhat angles in toward the large square in place of the larger border.

It turned out to be a really simple card but still has a lot of detail and depth.
• • • • • • • • • • • • • • • • • • • • • • • • • • • • • • • • • • • • • • • • • • • • •
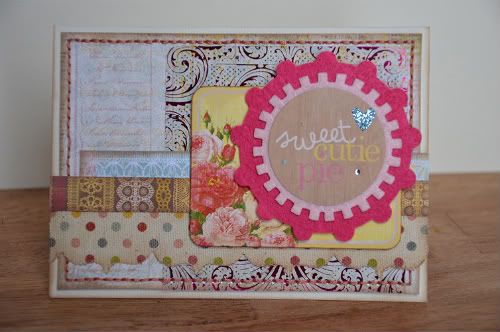
"Sweet Cutie Pie" card by Allison Davis
Supply list - Cardstock: Bazzill; Patterned paper: Pink Paislee; Canvas border strip: Pink Paislee; Transparency: Pink Paislee; Stickers: Pink Paislee; Felt circle: Pink Paislee; Embroidery floss: DMC
Variation #1 - I added a background piece of patterned paper cut just a little bit smaller than the card.
Variation #2 - For the largest square on the sketch, I used a transparency. It's slightly larger than the square on the sketch but I wasn't worried too much about that. I was using it as both part of the background and part of the square holding the designs and message.
Variation #3 - I kept two of the strips the same size as the sketch suggests but arranged them a little different. I decided to layer them instead of lining them side by side with margins. I also used a canvas border sticker in place of the bottom patterned paper on the sketch.
Variation #4 - I kept my embellishment (the pink felt circles) really simple on this since the papers, the journaling sticker, and the transparency had such strong, colorful patterns.
• • • • • • • • • • • • • • • • • • • • • • • • • • • • • • • • • • • • • • • • • • • • •
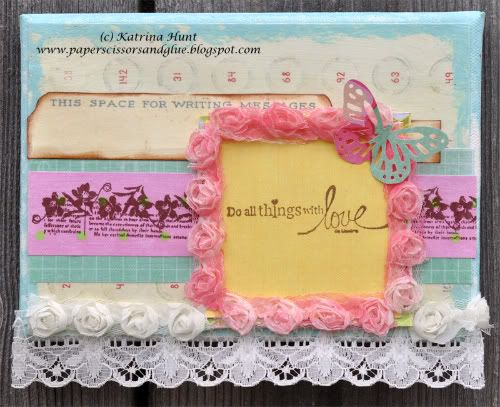
"Do All Things with Love" altered canvas by Katrina Hunt
Supplies - Pattern paper: K&Co Sweet Nectar Collection; Ribbon: Maya Road; Paint: Ranger Paint Dauber; Ink: Memento Dye Ink; Mist: Smooch Spritz; Stamps: Unity Stamp Co. January Kit of the Month; Canvas: (generic from Big Lots); Vintage Lace: Unknown; Adhesive: Fabri Tac and Mod Podge
When I saw the card sketch for some reason it screamed for me to do an altered canvas. Now this is really the first canvas that I have ever done with the layering and Mod Podge, but it was fun, and I am sure I will be making more!
• Variation 1 - Canvas, not a card!
• Variation 2 - Painting around the edges to add color.
• Variation 3 - Adding the ledger type tab on the left side of the sketch.
• Variation 4 - Stamping the flower strip along the middle section, instead of using pattern paper.
• Variation 5 - Adding lace along the bottom and then the cream flowers on top of the lace.
• Variation 6 - Using the same Maya Road flower ribbon, misting it, and then using it in place of the stitching to frame the sentiment.
•••••••••••••••••••••••••••••••

9 comments:
Wow these are all so different and fun. Love the boat and waves on the first one, can't believe the boat is handmade, great job. Allison how pretty in pink your card is. Everyone did a great job.
Great variations on the sketch!
Each card is gorgeous and unique!
great cards ladies - the boat card is soooo flippen cute!!! :)
Such great ideas. You ladies really know how to think outside the box!
Lulo
great takes on the sketch.
These are so pretty!! Great job!
Love them! Katrina I love all the adorable rosettes!!!
beautiful job all!
Post a Comment