
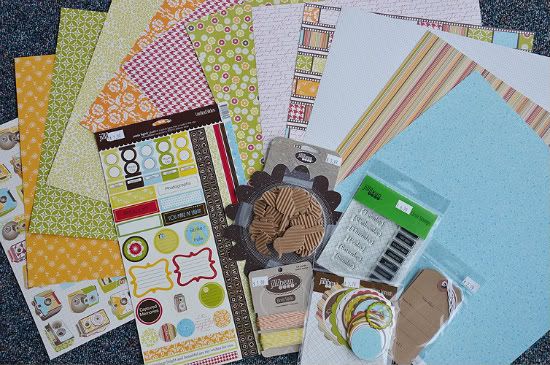
If you missed the Product Challenge during card week, Jillibean Soup has provided a kit of the same materials for each of our creative team members. The products we are using in our challenge (pictured below) are:
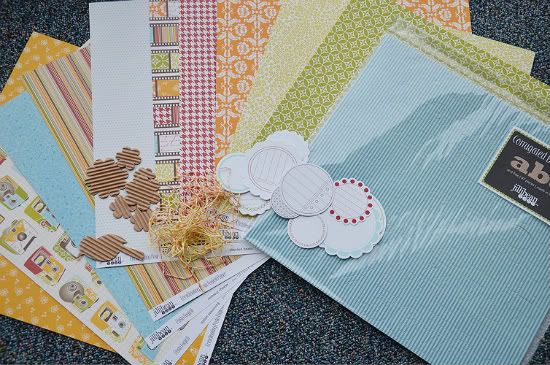
• Five sheets of patterned paper from the Pasta Fagioli collection.
• One sheet of Brown Pea Pod kraft patterned paper
• Blue Corrugated Alphabets
• Corrugated shapes
• Journaling Sprouts in red, green, blue, and brown
• Bean Stalks twine in orange and yellow
• One sheet of Brown Pea Pod kraft patterned paper
• Blue Corrugated Alphabets
• Corrugated shapes
• Journaling Sprouts in red, green, blue, and brown
• Bean Stalks twine in orange and yellow
Together with the February sketches we are going to show you how using the same products and even the same sketches can produce so many different results. We also came up with a list of basic supplies that would be okay for use with the product challenge like cardstock, punches, die cutting machines, paint, ink, etc.
Since it is two-page week all of the projects we are posting today are based on Two-page Sketch #8.
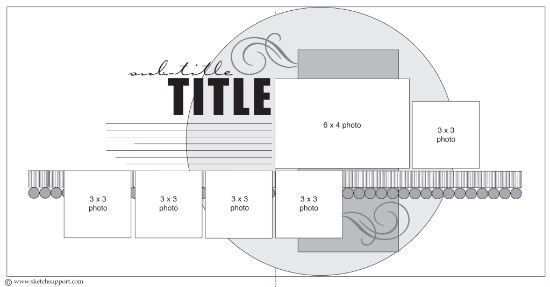
You can download and print this sketch by clicking on the two-page sketches link found under the "printable sketches" tab on the right sidebar.
Supplies - Patterned paper: Jillibean Soup; Mist: Tattered Angels; Ink: Tim Holtz Distress Ink, Ranger; Tools: Sizzix die cut
I didn't deviate too far from the sketch (for a change!). I added the embellishments and border at the top left of the layout. And rather than use the stripped strip with the circles I used the negative strip. I like it moving all the way across the page so as to "ground" the layout and move the eye across the page. I spiffed up the swirls with an added embellishment.
Another embellishment cluster was added to the top 3x3 photo.
• • • • • • • • • • • • • • • • • • • • • • • • • • • • • • • • • • • • • • • • • • • • •
Supply List - Cardstock: Bazzill; All other products: Jillibean Soup
Variation 1 - Instead of the giant circle I traced a die cut paper to create my own die cut paper.
Variation 2 - I changed some of the picture sizes and added more to accommodate the pictures I had to work with.
Variation 3 - I used a Journaling Sprout in place of the fourth picture on the bottom.
Variation 4 - I only used one strip instead of a striped strip and a decorative strip on the sketch. I wanted it to look like grass so I felt it would be too busy if I used more than one strip.
• • • • • • • • • • • • • • • • • • • • • • • • • • • • • • • • • • • • • • • • • • • • •
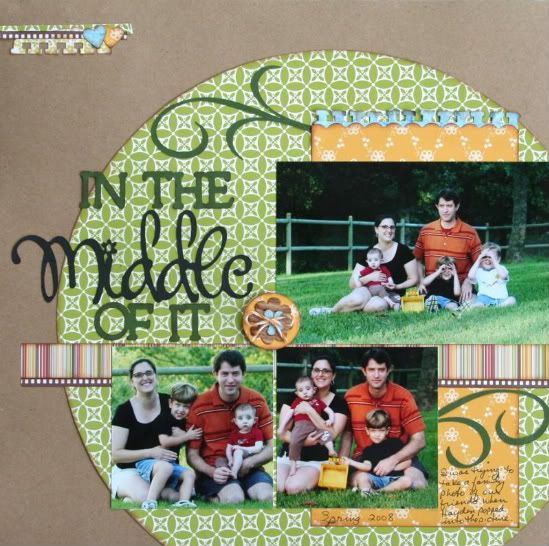
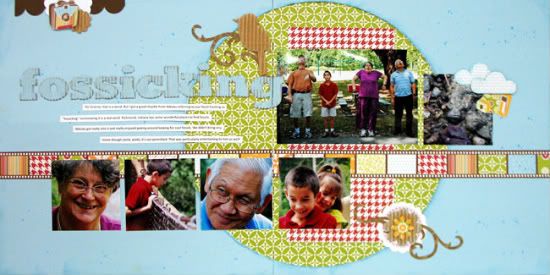
"In the Middle of It" by Shari ThurmanSupplies - Pattern paper, Bakers twine and Corrugated shapes: Jillibean Soup; Punches: EK Success and Fiskars; Ink: Colorbox Chalk Ink; Cardstock: Stampin' Up; Other: Cricut- Lyrical Letters and Wild Card (flourish)
I love these family photos I took of our friends, especially the one with my son in it. We kept him out of the photo for as long as possible. He couldn't control himself and had to plop right down next to his friend and pretend to take pictures of me.
Sometimes I will take a one-page sketch and stretch it, but this time I took a two-page sketch and cropped off the left and right side and used the middle. I used the circle in the sketch as my starting point and adjusted the photos and elements a bit. I let my 12 inch circle overlap my background on the right side and the bottom and then trimmed the edges. Doing this eliminated the smaller photo on the far right and the 2 smaller photos on the far left. Since my circle was now shifted to the right, I needed a little something in the top left corner to balance the layout. That is why I added the 3 small strips of paper and 2 tiny hearts. My stripped paper is cut to 11 1/2 inches.
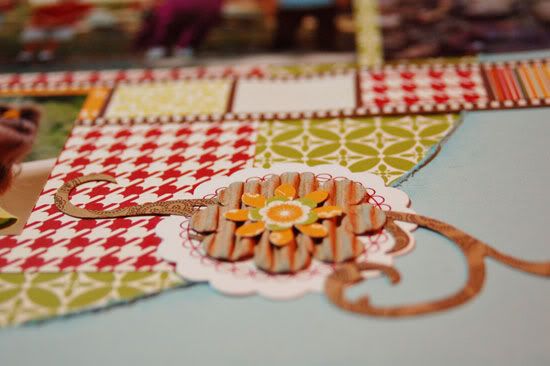
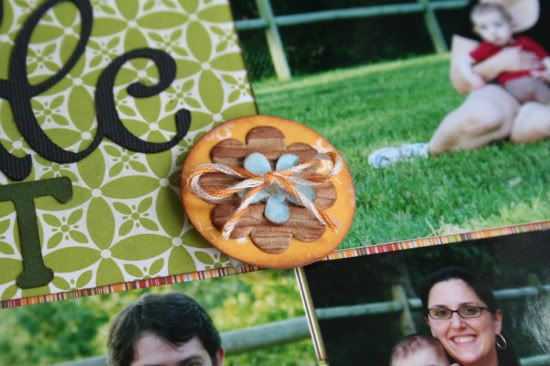
I just loved the flourishes in the sketch, so I used them as suggested. I punched a border on the 4 1/2 x 9 inch of pattern paper. I then layered it with the blue paper to add another dimension of color, because it was starting to look a little flat. I cut the title with my Cricut. Since my title was so big, I moved my journaling to the lower right. I then added the layered Corrugated flower embellishment to the middle of the layout to help support the title and add a little something extra.
• • • • • • • • • • • • • • • • • • • • • • • • • • • • • • • • • • • • • • • • • • • • •
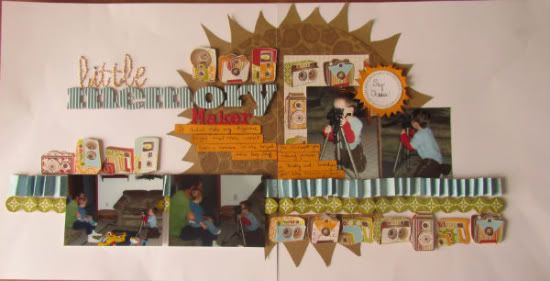
"Little Memory Makers" by Amy Roller
Supplies - All patterned papers: Jillibean Soup; Cardstock: Close to My Heart, We R Memory Keepers
Variation #1: I stayed with the circle background but because of the triangles I added around the edge for the "flash" effect, I had to make the circle base smaller.
Variation #2: I only had four pictures of this event so I ultimately had to go with fewer pics. The photos I had were also horizontal and so it worked out better leaving them wider so that they helped fill in that void that using fewer pictures caused.
Variation #3: Instead of the stripe we had in our package, I opted to make my own "stripe" buy folding a strip of the blue flower paper.

I felt it looked like a stripe but added movement to the page and matched my pictures better. I adhered this in place of the stripe on the sketch. I stuck with the circles shown and cut them out of another patterned paper and popped them up.
Variation #4: Next I decided the cameras on the background strip behind the largest picture followed my theme so well that I had to cut some of them out to add another strip across the page in several locations. This sort of draws your eye around the page. They also fill in for the swirls on the sketch.
I had my journaling area float across the layout to draw your eye over. It also conveniently covers up a distracting object in my largest picture.
• • • • • • • • • • • • • • • • • • • • • • • • • • • • • • • • • • • • • • • • • • • • •
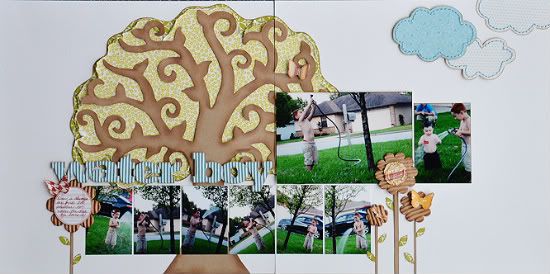
"Water Boy" by Allison Davis
Supply list - Cardstock: Bazzill; Punch: Martha Stewart; All other products: Jillibean Soup
This is one of those pages that at first glance you might think it looks nothing like the sketch. I kept a little of the sketch, took a little out, and added a little extra. The idea definitely stemmed from the sketch, I just happened to let my creativity take over.
Variation #1 - I decided to make a huge tree to use in place of the circle. Since the tree was such an important part of the theme I didn't want to cover it up with pictures. Moving it to the left page was an easy solution.
I'll openly admit when I mess up. I was so mad at myself when I was about halfway done with this layout. The tree was a fun idea and I was so anxious to see the finished result, that I didn't pay attention to the normal details that I am usually very aware of. Yes, that is my son facing off the page. And after I've said it several times that I never do that! I was kicking myself for not flipping the sketch. Especially when I realized that he would have been facing the tree and it would have looked like he was watering the tree on the page. What can I say? The creative side of my brain was too excited and going to fast for the other, logical side of my brain to keep up.
Variation #2 - I had a lot more pictures I wanted to add so I cut them to 2 x 3 instead of 3 x 3 as the sketch suggests.
Variation #3 - One of my favorite things to do from time to time is to create a scene or landscape and that's what I did with this layout. That is why I decided to remove the strips and the rectangle piece on the sketch. To finish out the landscape I added flowers to the bottom of the page, a few clouds to the top right corner, and a few butterflies.
• • • • • • • • • • • • • • • • • • • • • • • • • • • • • • • • • • • • • • • • • • • • •

"Thomas" by Mireille Divjak
Supplies - Cardstock: Bazzill; Glimmer Mist: Tattered Angels; Sizzix dies: Tim Holtz alterations, gadget gears; Ink: Colorbox; Punch: EK Success; Pen: Staedler; All other products: Jillibean Soup
• I sprayed some glimmer mist on my cardstock and made it "messy" so I could accentuate the drips with a fine liner.
• The wall is hand drawn
• I used the Jillibean twine it to sew on the strip.
• I distressed the title. (just LOVE those alpha's, really really amazing!)
Story:
Noah is so in love with his Thomas the Tank Engine trains He plays with them everyday and takes them to bed when he goes to sleep. He got Knapford Station and a few new trains from Santa and then
it hit me, I've never scrapped Thomas before, so this was a "have to".
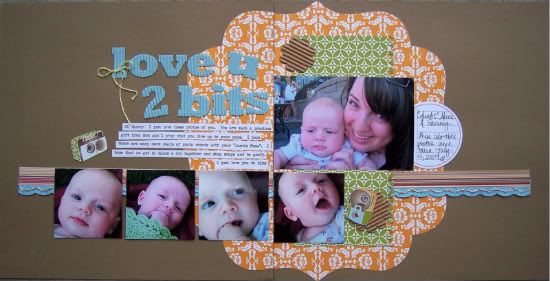
"Love U 2 Bits" by Melissa Elsner
Supplies - Cardstock: Recollections; Patterned Paper, alphabet, corrugated chipboard, journal spot, twine: Jillibean Soup; Electronic Cutter: Silhouette SD; Punch: EK Success; Font: Urania Czech
Variation #1: Instead of a circle, I traced the shape of some paper from my stash to create the scalloped base.
Variation #2: The Silhouette has a lot of really cool faux stitching templates. I tweaked it a bit by making it work to actually hand stitch. The shape is a scalloped strip and I placed the holes at intervals to make the stitching even. Then used the bakers twine from Jillibean to create the stitching.
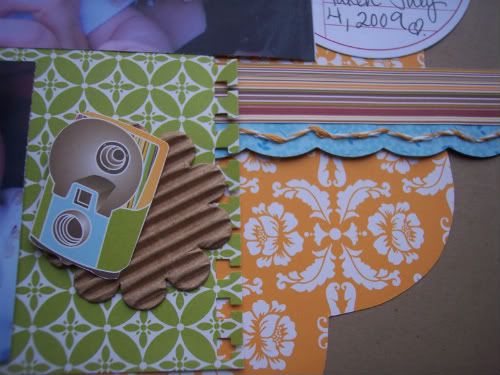
Variation #3: The cameras were too cute! I cut them out and used a couple as embellishments on the page. They worked perfectly due to using limited supplies and they were the perfect addition to this layout.
• The wall is hand drawn
• I used the Jillibean twine it to sew on the strip.
• I distressed the title. (just LOVE those alpha's, really really amazing!)
Story:
Noah is so in love with his Thomas the Tank Engine trains He plays with them everyday and takes them to bed when he goes to sleep. He got Knapford Station and a few new trains from Santa and then
it hit me, I've never scrapped Thomas before, so this was a "have to".
• • • • • • • • • • • • • • • • • • • • • • • • • • • • • • • • • • • • • • • • • • • • •
"Love U 2 Bits" by Melissa Elsner
Supplies - Cardstock: Recollections; Patterned Paper, alphabet, corrugated chipboard, journal spot, twine: Jillibean Soup; Electronic Cutter: Silhouette SD; Punch: EK Success; Font: Urania Czech
Variation #1: Instead of a circle, I traced the shape of some paper from my stash to create the scalloped base.
Variation #2: The Silhouette has a lot of really cool faux stitching templates. I tweaked it a bit by making it work to actually hand stitch. The shape is a scalloped strip and I placed the holes at intervals to make the stitching even. Then used the bakers twine from Jillibean to create the stitching.
Variation #3: The cameras were too cute! I cut them out and used a couple as embellishments on the page. They worked perfectly due to using limited supplies and they were the perfect addition to this layout.
• • • • • • • • • • • • • • • • • • • • • • • • • • • • • • • • • • • • • • • • • • • • •
• • • • • • • • • • • • • • • • • • • • • • • • • • • • • • • • • • • • • • • • • • • • •
Now it's your turn!
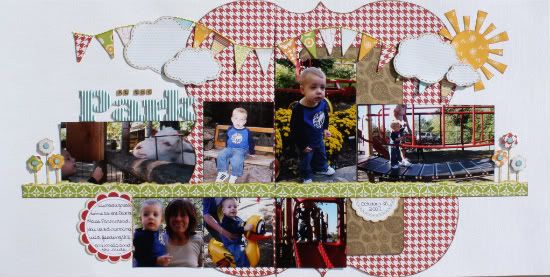
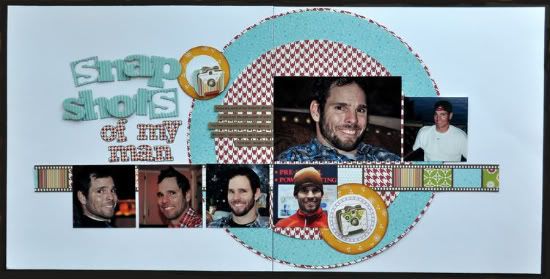
"Snapshots of My Man" by Jill Sarginson
Supply list - Cardstock: Bazzill; Patterned Paper: Jillibean Soup - Pasta Fagioli; Alphabets: Jillibean Soup; Ink: Versamark; Embellishments: Jillibean Soup; Tools: Creative Memories circle cutter; Other: Pop dots
Variation #1: I opted to layer the large circle. I used the red hounds tooth paper as a base and then put the blue pattern paper on top. I didn't think it popped enough so using a circle cutter, I cut another circle out of the base paper and placed it on top (as the top layer). The sketch used a rectangular piece however I opted to go circular (I love circles!).
Variation #2: I replaced the swirls with some circular embellishments and hand-cut embellishments (cameras) from the pattern paper.
Now it's your turn!
This week the challenge for you is similar to the challenge we took on with the products from Jillibean Soup.
Using Two-page Sketch #8, create a layout that includes EACH of the following supplies:
• patterned paper
• chipboard
• a journaling tag or die cut
• twine or ribbon
• flowers
You can use any other products you would like along with the product challenge supplies.
After you have created your project: in the comments post a link to your project (it can be in an online gallery or on your blog).
This week we are giving away an awesome Jillibean Soup prize package to the winner of the challenge.
The giveaway includes many of the product we used in our product challenge and more.
You have until Friday, February 18 and we will post the winner on Sunday, February 20.
21 comments:
Awesome job ladies. I really need to invest in some Jillibean soup! I love them! I love all the various takes on the backgrounds and on the embellishments! Lots of inspiration!
I loved them all and especially love the different backgrounds on them. Such cute babies and fun themes. Too bad I don't have any JB product to play around with. Thanks for a awesome week again ladies.
p.s. Allison don't feel to bad about your photo, I'm one of those who didn't even notice till I read your writing. It looks great.
Oh Allison, don't you just hate getting those aha moments after the glue has dried! :)
Great layouts and a wonderful week of inspiration from all of these wonderful ladies! Thanks so much for sharing!
Nice job again on all of the layouts. Love the Jillibean Soup products!
Awesome! And the DT examples definitely set the bar - wow to all of them!
Oooh I love having everyone's layouts side by side using the sketch and product. So cool!
Here's the layout I did at our local crop today with this month's double layout and the prescribed items.
http://jersey-scrapper.blogspot.com/2011/02/load-12-blues-brothers-at-universal.html
I love Mireille's hand-drawn wall! Very ambitious!
Here's my layout based on your sketch and the required supplies.
Thanks!
http://jersey-scrapper.blogspot.com/2011/02/load13-forbidden-journey.html
Here's another layout with this versatile sketch. I kept it simple to not cover the themed paper but used all the required elements
I tried out your sketch at our monthly crop and this is what I came up with.
Love the sketch by the way.
http://lorraine-jersey.blogspot.com
I LOVE this sketch!!!! It has many pleasing elements and is very well balanced. I can see myself going back to this sketch time and again!
Here's my take on it!
http://www.facebook.com/album.php?aid=98594&id=1051852438&l=5b835e63d3
So much inspiration here!
Here is my layout for the contest,love this sketch and it was so much fun doing!! Thanks for such a great site.
http://www.facebook.com/album.php?aid=2009465&id=1362476941&saved#!/photo.php?fbid=1628404274303&set=a.1046679291542.2009465.1362476941&theater
YAY, my first Sketch Support challenge entry. So fun!
http://lisaandeddy.blogspot.com/2011/02/sketch-support-challenge.html
http://www.twoscrapbookfriends.com/photopost/data/500/medium/Sketch_Support_sketch_8.jpg?5756
Here's my entry.
Did not use Jillibean because I used it all and need more!
The sketch was so easy to work with I had to change a little due to size of my pictures.
Here's my take on the sketch...still needs journaling, so I threw it into my photobucket for now, but I'll post it on my blog when it's done, done. Loved this sketch!
http://img.photobucket.com/albums/v629/sillypea/IMG_3546.jpg
Well, my photo of my layout isn't great - very dark, but that's what I get for waiting 'til the last minute to finish up. Anyway - thanks for the wonderful sketch! Love seeing others' interpretations of it too.
I don't have a blog, so here's the link to my flickr account:
http://www.flickr.com/photos/47273565@N06/5457276567/
I had the same problem as the other late entries, dark photos, oh well, will retake tomorrow.
Here is my layout.
I know that this is after the deadline but here is better picture of my layout I did for the challenge:
http://onmygravelroad.blogspot.com/
I started a blog, I am unsure how it will go but it is a start.
Silly Peas and Cynthia B Love your layouts. gorgeous!
and Mary Bez love your garden and layout.
Really they are all so great.
Love this site.
Post a Comment