Showing posts with label one-page sketches. Show all posts

Sunday, May 20, 2012

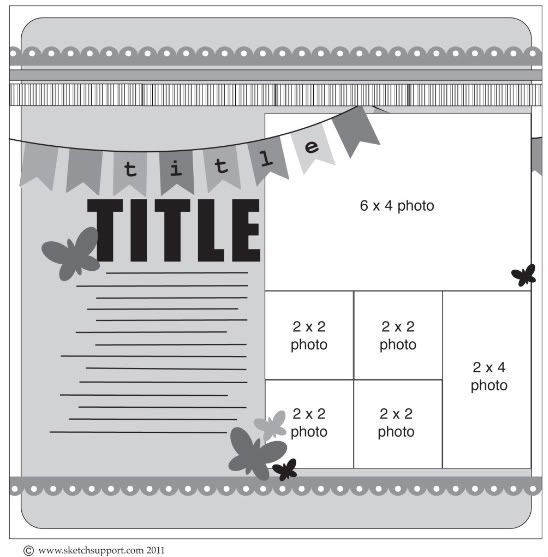
One-page Sketch #22

•••••••••••••••••••••••

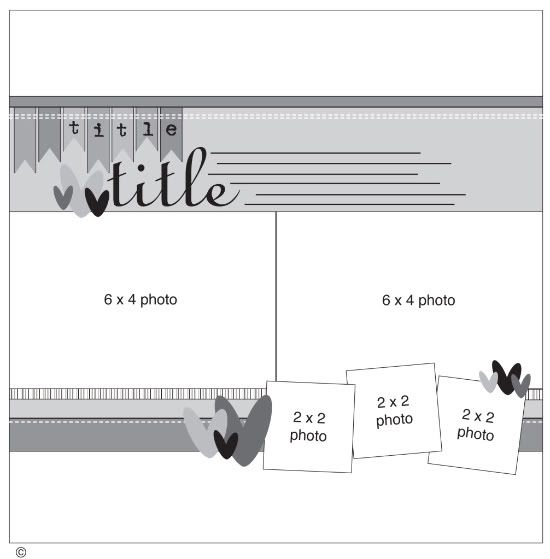
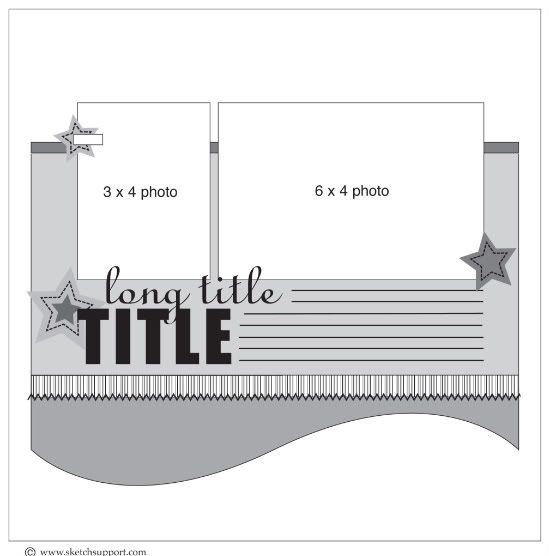
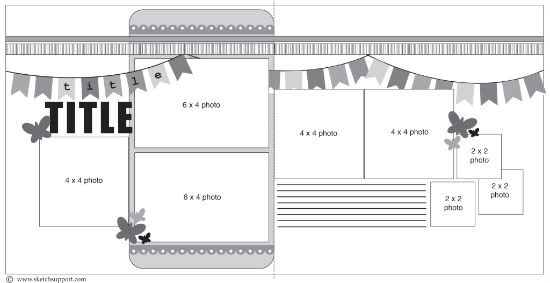
You can download and print this sketch by clicking on the one-page sketches link found under the "printable sketches" tab on the right sidebar.

Be sure to check back throughout the week to see how our creative team used this sketch.

  • • • • • • • • • • • • • • • • • • • • • • • • • • • • • •

Giveaway Winner

Melanie said...
Love all of your sketches!

You can email me at allison@scrapbookgeneration.com with your shipping information and we'll get that sent out to you! 

Sunday, April 22, 2012

One-page Sketch #21

••••••••••••••••
 
You can download and print this sketch by clicking on the one-page sketches link found under the "printable sketches" tab on the right sidebar. 


Be sure to check back throughout the week to see how our creative team used this sketch.
••••••••••••••••••

Saturday, April 14, 2012

"Meet the Creative Team" Blog Hop

•••••••••••••••••••
Welcome to our "Meet the Creative Team" blog hop!

What better way for our readers to learn a little about our Creative Team than with a blog hop! I've had the opportunity to get to know these girls beyond their scrapbooking talents and I just don't know if it's possible to have a better group of women. I am so thankful for all the time and effort that they all put into Sketch Support. I'm also excited that you'll get to know them a little better with this hop!

Of course we are going to do the blog hop in Sketch Support style. We've got:

• a new sketch (a sneak peek from our new Sketches for Scrapbooking: One-page Sketches, Vol. 2)
• lots of different examples of how to use the sketch
• and lots of giveaways

Here's how the blog hop will work:

At the bottom of this post you will find links to each of the Creative Team member's blogs. You can jump around if you like but we recommend starting at the first on the list and at the end of her post you can click the link and "hop" to the next blog.

Along the way you'll find projects based on our new sketch, One-Page Sketch #20


You can download and print this sketch by clicking on the one-page sketches link found under the "printable sketches" tab on the right sidebar. 

You'll also find some giveaways as you travel along to each blog. To be eligible for those you'll have to visit their blog and read their requirements. And, of course, we have to do a giveaway here at Sketch Support too! Our favorite giveaway is:

"The Ultimate Scrapbook Generation Kit Club Sampler" 

The winner of this giveaway will receive:

• Super Sketch Club kit - includes the materials and sketches to make five two-page layouts.

• Boy Crazy kit - includes the materials to create a two-page boy themed layout with a sketch.

• Girl Crazy kit - includes the materials to create a two-page girl themed layout with a sketch.

• Generation Page kit - includes the materials to create a two-page layout with a color photo of the layout and directions.

• Hall of Fame Page kit - includes the materials to create a two-page layout with a color photo of the layout and directions.

• Generation Card kit - includes the materials to create four cards with color photos of the cards, directions, and a cutting guide.

To sum it up that's seven sketches and the materials to make nine two-page layouts and four cards!

And not to sound too much like an infomercial but, that's not all! We're also going to throw in a copy of our two newest sketch books:

• Sketches for Scrapbooking: Travel Sketches

• Sketches for Scrapbooking: One-page Sketches, Vol. 2

To be eligible for "The Ultimate Scrapbook Generation Kit Club Sampler" and books you have to leave a comment at each Creative Team member's blog/post along the hop. After you do that, come back here and let us know in the comments on this post.

It's time to get to hoppin'! We are actually starting off the first post in the hop here at Sketch Support. The link to Penny's post will take you to the post below this one. You'll be able to follow the rest of the hop from there! Have fun!

•••••••••••••••••

Sunday, March 25, 2012

One-page Sketch #19

••••••••••
You can download and print this sketch by clicking on the one-page sketches link found under the "printable sketches" tab on the right sidebar.

I don't know if they have a specific name (I like to call them banner strips) but I've been using the strips with the "v" cut on at the ends a lot lately! They are a great way to take a simple strip and give it more detail and interest and with little time and effort.

The are several ways to cut the little "v" on the ends:

• The most time consuming is measuring. I don't recommend this one but if you want them to be super perfect, go for it!

• The easiest and fastest is to just wing it and cut the ends with scissors.

• The next option is kind of like a compromise between measuring and freehand cutting it. Our creative team member Penny Grimsley mentioned folding the strip in half with a soft fold (not creating an actual crease down the middle) and then snipping a line along the soft fold.  A 1/4" to 1/2" should be enough. Then you can use the top of the snipped line as a guide and go from one corner to the top of that line. Repeat with the other corner.

• The last option (this one was shared with me yesterday during a class and it's definitely one that makes you think "Why didn't I think of that!") is to use a square punch and only use a corner of it to punch the "v".

We've got a week full of wonderful layouts so be sure to check back throughout the week! It's always nice to hear what our readers think of all the layouts and projects shared during the week!
••••••••••••••••

Sunday, February 19, 2012

One-page Sketch #18

•••••••••••••••••••••••••

You can download and print this sketch by clicking on the one-page sketches link found under the "printable sketches" tab on the right sidebar.

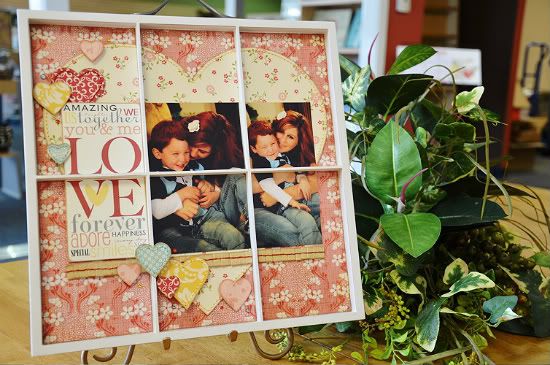
One-page Sketch #14 is actually based on a project I made for Sketch Support during Add-on Week last February.


"Love" Photo Tray by Allison Davis
Supplies - 4 x 6 Photo Tray: 7Gypsies; Patterned paper: October Afternoon, BasicGrey, My Mind's Eye, and Scenic Route; Jewels: Kaisercraft; Embroidery floss: DMC

Take away the photo tray and it's a one-page layout just begging to be turned into a sketch!

Theme-wise there are many options, of course! Stars and circles would look great with the same design as the hearts.

As for the pictures here are a few options:

• Use two 3 x 4" photos in place of the 4 x 6"
• Use one 3 x 6" photos in place of the two 3 x 3"
• Use a 5 x 7" in place of the 4 x 6" and adjust the papers and pictures as needed.
• Use a 3 x 3" photo in place of half the jouraling.
• Use a 6 x 4" and three 2 x 2" photos in place of all the photos on the sketch.

Check back tomorrow and throughout the whole week to see the different ways our creative team used this sketch!
•••••••••••••••••• 

Sunday, January 22, 2012

One-page Sketch #17

•••••••••••••••••••••••••

You can download and print this sketch by clicking on the one-page sketches link found under the "printable sketches" tab on the right sidebar.

On of my favorite designs to do is added a large shape to the background. It's such an easy way to add an eye-catching element to the page. This month, the one-page sketch has a large star for the background and you can easily play around with other shapes like a large heart or a large circle. Another great substitute would be a die cut patterned paper.

Want to include more pictures? Try these ideas:

• Use two 3 x 4" photos.
• Use two 3 x 3" photos.
• Use six 2 x 2" photos.
• Use two 4 x 4" photos.
• Keep the 6 x 4" as is and then add a few 2 x 2" photos on the bottom of the 6 x 4"
• Replace the journaling with a few 2 x 2" photos or a 3 x 3".

Be sure to check back throughout the week to see what our creative team has done with this sketch!
•••••••••••••••••

Sunday, December 25, 2011

One-page Sketch #16

•••••••••••••••••••
Happy Holidays to all of our Sketch Support readers!

You can download and print this sketch by clicking on the one-page sketches link found under the "printable sketches" tab on the right sidebar.

It's hard to believe that we are entering into the last week of the 2011 year! One-page Sketch #16 will be the last sketch of this year!

I've always wanted to do a layout that showcased our favorite ornaments on our tree so I started playing around with the some different sketch designs. This design seemed to stand out with the larger photo, the five small photos, and the hanging ornaments to enhance the theme. That larger photo would work so well as a full picture of the tree and then close up photos of the individual ornaments for the smaller photos.

Don't celebrate Christmas or want to use this sketch for a different theme? No problem! Those hanging ornaments could also be hanging spiders for Halloween, hearts, stars, snowflakes, or try flipping them and turning them into flowers. There are lots of possibilities!

Check back tomorrow to see what our creative team has done with this sketch!

Sunday, November 20, 2011

One-page Sketch #15

••••••••••••••••••••••••


You can download and print this sketch by clicking on the one-page sketches link found under the "printable sketches" tab on the right sidebar.

Winter will be knocking at the door soon but we're going to squeeze in one more fall sketch before that time comes!  Don't worry if you aren't thinking Fall with this sketch. Those leaves can easily be transformed into falling snowflakes, raindrops, hanging ornaments, or more basic shapes like hearts or stars.

Here are a few ideas for using different sizes of photos:

• Use a 6 x 4 in place of the two lowest 3 x 4 photos.
• Use three 3 x 3 photos and adjust the title as needed.
• Remove the far right 3 x 4 photo for more journaling space.
• Use a 4 x 6 in place of one of the 3 x 4 photos and adjust the papers as needed.

Check back tomorrow for the beginning of One-page Week. As always, our Creative Team has put together some fabulous layouts based on the sketch! Speaking of Creative Team, the deadline for entries for our 2012 Creative Team is nearing. Be sure to get those entries in by Wednesday, November 23!

Sunday, October 23, 2011

One-page Sketch #14

•••••••••••••••••••••


You can download and print this sketch by clicking on the one-page sketches link found under the "printable sketches" tab on the right sidebar.

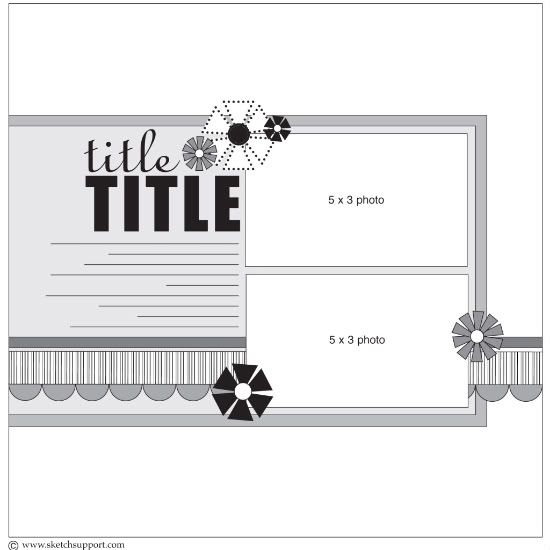
Because we are doing a Simple Stories product challenge this month, this sketch was based on the 4 x 6 Journaling Card Elements and can be used with any of the Simple Stories collections.

Most of the photos on this sketch are small but there are a few options to work in some larger photos.

• Use another 5 x 3" photo in place of the three smaller photos on the top.
• Use a 6 x 4" photo in place of the 5 x 3"
• Use a 4 x 4" photo in place of the three smaller photos on the top.
• Use a 3 x 3" photo in place of the 2 x 2 on the bottom.

You can also get a little more journaling space by removing the 2 x 2 photo on the bottom.

We've got another great week of layouts to share and don't forget the Simple Stories product challenge on Friday!
•••••••••••••••••••

Sunday, September 25, 2011

One-page Sketch #13

••••••••••••

  You can download and print this sketch by clicking on the one-page sketches link found under the "printable sketches" tab on the right sidebar.

Lately, I found myself loving little flags and what a fun embellishment they are to add to a page so I couldn't wait to make a sketch that incorporated them into the design. On this sketch the flags can be a great way to add in some more color or could double in function as both an embellishment and as a way to get more information on the page like the date or names of people in the pictures.

The 5 x 3 photo could definitely be enlarged to a 5-1/2 x 3-1/2 or a 6 x 4. You could even change the orientation of it by using a vertical photo without having to adjust much to allow the larger height on the photo. As for the 3 x 3 photos, you can use smaller to add more or even go with a larger one like another 5 x 3.

One page week is always the one with the most layouts to share and this week is no exception! Be sure to check back throughout the week to see what our creative team has put together with this sketch!  

Sunday, August 21, 2011

One-page Sketch #12

•••••••••••••••••••••


 You can download and print this sketch by clicking on the one-page sketches link found under the "printable sketches" tab on the right sidebar.

One thing I love about sketches with a big photo block is the possibilities you have for adding more photos. It's always easier to add more when you have such a large area to play around with and you have that area as a guide. I look at the area and try to see what photo size combinations I can use to keep that same sized area but, with more photos. Here are some more photos options for the two 6 x 4 photo block on One-page Sketch #12:

• four 3 x 4 photos
• one 6 x 4 photo and two 3 x 4 photos
• three 4 x 4 photos
• two 4 x 4 photos and four 2 x 2 photos

You can also add more photos that end up larger than the two 6 x 4 photos and then adjust the papers like:

• three 4 x 6 photos
• six 3 x 3 photos
• three 4 x 4 photos with a row of six 2 x 2 photos above

This sketch is also very easy to convert to a two-page layout and we've got lots of examples to prove that! Check back on Monday to see the many ways our creative team put this sketch to use!
 ••••••••••••••••••••••••

Sunday, July 24, 2011

One-Page Sketch #11 and Sketches for Scrapbooking: One-page Sketches, Volume 1

••••••••••••••••••••••••


 You can download and print this sketch by clicking on the one-page sketches link found under the "printable sketches" tab on the right sidebar.

Because of our July 1 debut of our newest book, Sketches for Scrapbooking: One-page Sketches, Volume 1,  we thought this would be the perfect time to show you one our favorites from the book. This will also be the sketch that we are using throughout One-page Week.

Sometime it's just plain fun to work with smaller photos and this sketch is just that, fun. With three small photos and an eye-catching larger embellishment this sketch has lots of possibilities. Don't worry if you don't work with those size of photos because you can easily substitute larger photos and then adjust the background as needed.

Sketches for Scrapbooking: One-page Sketches, Volume 1 Giveaway


I have to say, designing these sketches was a lot of fun for me. I've been designing two-page sketches for years so it's been very enjoyable over the last six months to switch it up and start working with a different size. I had no idea how much of a difference it was!

Today we are excited to give away a copy of the first book in our new Sketches for Scrapbooking series to one of our Sketch Support readers. To be eligible leave a comment on this post, we'll pick a random winner, and then announce the winner on Wednesday. 

Also, you might want to keep an eye on our creative team member's blogs this week. They are going to be giving away some books too! You can find all their blogs from the links on the sidebar.
••••••••••••••••••••

Sunday, June 19, 2011

One-Page Sketch #10 and a few announcements

•••••••••••••••••••••••••


  You can download and print this sketch by clicking on the one-page sketches link found under the "printable sketches" tab on the right sidebar.

I'll admit it's a rare thing for me to create a layout with only one picture and a lot of times I'm trying to creatively cram as many pictures as I can onto a page. But, of course, there are always those times when you have one outstanding picture that you want to showcase all on it's own.

If you have more photos than just one or don't work with enlargements, here are a few options for this sketch:

• Use a 6 x 4" photo
• Use two 3 1/2 x 5" photos
• Use six 2 1/2 x 2 1/2" photos
• Use three 2 1/2 x 4" photos
• Use a 5 x 5" photo (cut down from a 5 x 7 or an 8 x 10)
• Use a vertical 4 x 6 photo

We've got lots of great projects to share with you from our talented creative team so be sure to check back tomorrow for One-page Week!

 • • • • • • • • • • • • • • • • • • • • • • • • • • • • • •

Sketches for Scrapbooking
••••••••••••••
It's that time again! Every year on January 1 and July 1 we produce a new sketch book. July 1 is right around the corner and this time we've got not one, but two new sketch books. 
••••
The first is the 8th Volume of our popular Sketches for Scrapbooking series. Just like the earlier volumes, this one has 30 two-page sketches by Debbie Sanders and Allison Davis.
••••••••
The second one is our new series of sketch books: Sketches for Scrapbooking, One-page Sketches. Volume 1 has 30 one-page sketches designed by Allison Davis.
••••••••••
Both of these new books are available for pre-order. Each book is priced at $15.99. If you pre-order now, your order will ship on July 5. (Shipping is only $2.99 regardless of how many sketch books you order!) To pre-order one (or both) of the books click here.

 • • • • • • • • • • • • • • • • • • • • • • • • • • • • • •

Sketch Support: the class
••••
Due to growing popularity, Sketch Support with Allison Davis (the class) will be offered at My Creative Classroom again this summer and this fall. The summer class will begin on July 6. (The fall session will be announced at a later date.) At this point we are thinking this will be a class that will be offered many times. The information is this class is packed with tips, tricks, and techniques for using sketches that will never go out of style. 
••••••
Here's more information:
••••••
 In this five week course you'll learn to stop wasting valuable time on page design and how to use sketches to increase your productivity, expand your style, and multiply your personal satisfaction. You'll see how easy it is to adapt a sketch to your own style or skill level and how to add simple to extreme variations to get multiple uses out of one sketch.

Start Date: Wednesday, July 6
Fee: $30
Length: 5 weeks

Also:
• you will get 5 new sketches that aren't in any of the Sketches for Scrapbooking books.
• there will be lots of time with me so I can help you with areas you might be struggling with.
• most of the class is focusing on getting the most out of sketches but there will also be tips and tricks for design, techniques, finishing touches, picking out papers, and more.
• each week will focus on a specific area of the sketch like photos, papers, embellishments, etc.

Plus, everyone who signs up for the class will get 10% off any Sketches for Scrapbooking order!
••••••
The beauty of online classes is that you can come and go as you please and as often as you want. There is a student gallery to share your layouts from the assignments and a forum to discuss the lesson or ask questions. It's a lot of fun! 

To register for the class you'll need to visit My Creative Classroom.
•••••••••••••••••••••••

Sunday, May 22, 2011

One-Page Sketch #9

•••••••••••••••••••••••••••••••


You can download and print this sketch by clicking on the one-page sketches link found under the "printable sketches" tab on the right sidebar.

I apologize for the delay in posting the new sketch this evening! We had some pretty nasty weather here and took cover at a family member's house.

The new one-page sketch has two photos but there is always room for more. Here are a few photo options you can use to adjust the sketch to fit the photos you want to use:

• use two 3 x 4 in place of the 6 x 4 photo
• use three 3 x 3 photos in place of both photos
• use six 2 x 2 photos in place of the 6 x 4
• use six 3 x 3 photos in place of both photos on the sketch. You will probably need to shift the sketch down so that everything remains balanced.
• use a 3 x 5 and a 7 x 5 in place of both photos.

There are also several ways you can play around with the wavy piece along the bottom. Here are a few examples:

• add a line of small embellishments like hearts, stars, flowers, buttons, or brads along the wavy edge
• use a scallop strip or any other decorative strip in place of the wavy piece
• use a wide, detailed ribbon like lace in place of the wavy piece
• find a way to incorporate the theme of your page into the design of the wave like cars driving on a road, flowers blooming on hills, or a splash of water at the end of the wave.

One-page week starts tomorrow and we've got our last of the bonus sketches on Friday!

Friday, May 13, 2011

Two-Page Week, Part 5 and two bonus sketches

••••••••••••••••••••
We apologize for the delay in posting. We had some technical difficulties with the site.

Two-page Sketch #13


 You can download and print this sketch by clicking on the two-page sketches link found under the "printable sketches" tab on the right sidebar. 


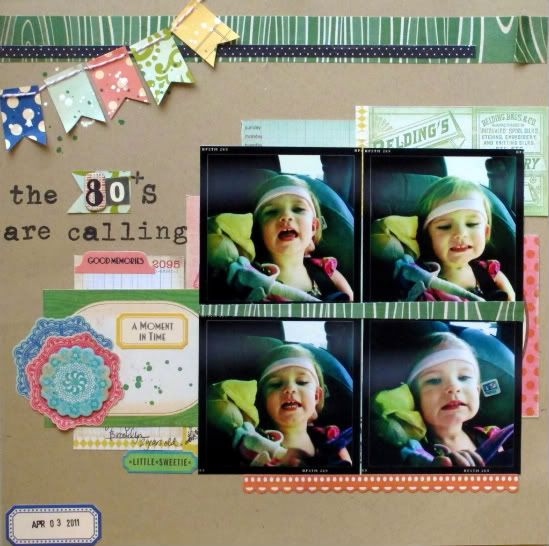
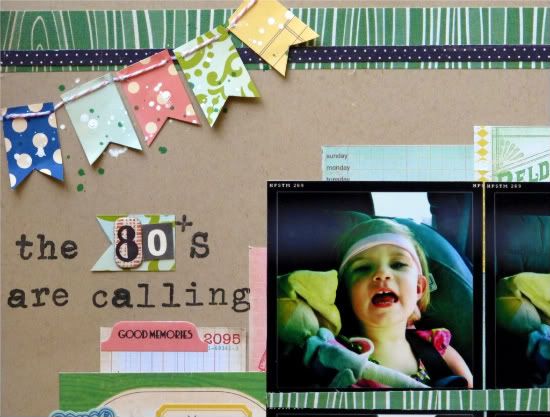
"The 80's are Calling" by Christy Arthur
Products - Hero Arts: Typewriter Stamp; October Afternoon: 5&dime Root Beer Barrels, Bubble Gum, Jawbreakers, Butterscotch, Lemondrops, Word and Shape Stickers, Miscellany; Crate Paper: Emma's Shoppe Borders, Phrase Stickers, Accent Cuts and Chipboard; Portrait Accent Cuts; Jenni Bowlin: Bingo Alpha Tile; Sassafras: Numerical Chipboard; Ranger: Adirondack Pitch Black ink; Studio Calico: Mister Huey Calico White and Pickle, Green Woodgrain fabrip; Other: Twine

• I used the left side of the two page sketch and turned it into a one page layout.

• I used four smaller 3x3 photos instead of the two larger 6x4 photos in the sketch.

• I layered different journaling cards behind the photos instead of the one, larger rectangle of paper in the sketch. I made that "rectangle" of journaling cards slightly smaller than the rectangle in the sketch (mine does not stretch behind the top horizontal strip).

• I made the banner smaller so it was in the corner more than stretching across the page like the sketch.


• I used a journaling card instead of the 4x4 photo and hid my journaling behind the accent card.

• I added a date accent to the bottom left corner, that is not in the sketch.

 • • • • • • • • • • • • • • • • • • • • • • • • • • • • • •


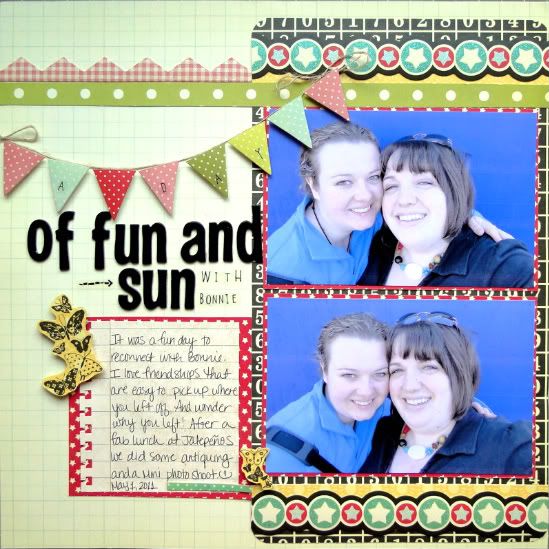
"A Day of Fun and Sun" by Melissa Elsner
Supplies - Paper, Border and Banner stickers: Pink Paislee; Alphabet Stickers: American Crafts, Cosmo Cricket; Stamp: Inkadinkado; Stamp Ink: Versafine; Border Punch, Corner Punch: EK Success

Design Notes: I was very excited to see some banners on this sketch but didn't have enough photos to fill up a two pager. I shrunk it to the one page and used one of the spots for a photo as a journaling block. To create the banner, I snipped off the triangles from the border sticker by Pink Paislee and then adhered them with pop dots. To create the areas where an embellishment was suppose to go, I simply stamped on the patterned paper and cut out the images.

 • • • • • • • • • • • • • • • • • • • • • • • • • • • • • •

Bonus Sketches
You can download and print these sketches by clicking on the one-page sketches link found under the "printable sketches" tab on the right sidebar.

One-Page Sketch #7 - based on the left page of two-page sketch #13


One-Page Sketch #8 - based on the right page of two-page sketch #13


•••••••••••••••••••••••••••••

Friday, May 6, 2011

Card Week, Part 5 and a bonus sketch

•••••••••••••••••••••••••••••••••••••
Shari, Christy, and Suzanna have all created wonderful layouts based on the card sketch. Each one uses the sketch in a completely different way.

We've also got our first bonus sketch in celebration of National Scrapbook Day and don't forget to check back tomorrow for our National Scrapbook Day blog hop! 

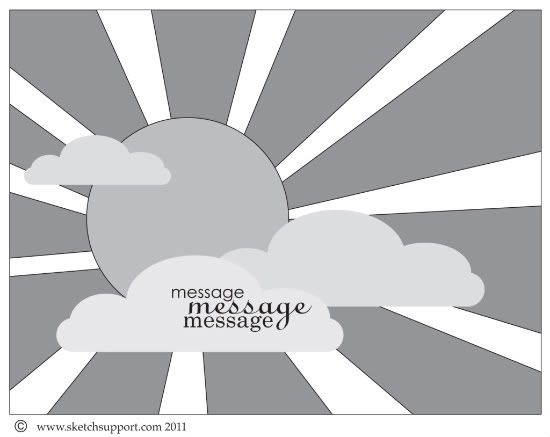
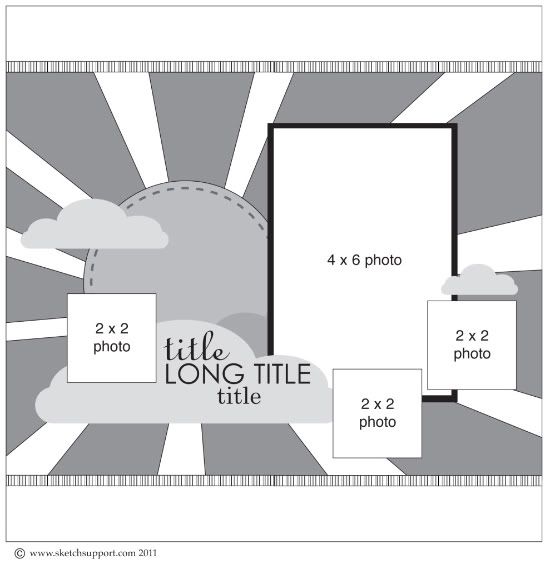
Card Sketch #6


You can download and print this sketch by clicking on the card sketches link found under the "printable sketches" tab on the right sidebar.


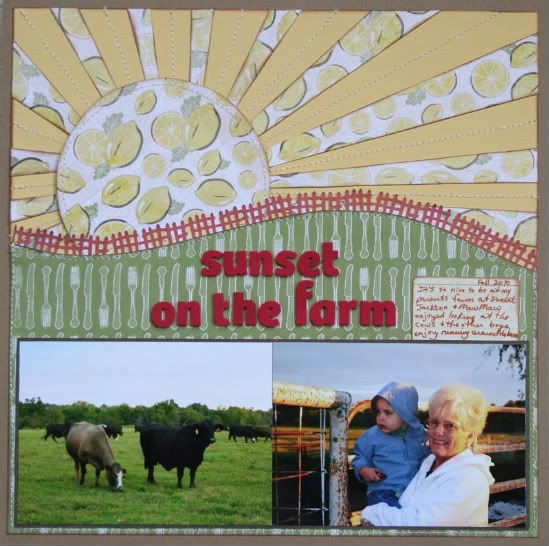
"Sunset on the Farm" by Shari Thurman
Supply List - Pattern Paper and Die Cut Elements: Kaiser Craft; Tools: Martha Stewart border punch; Ink: Colorbox Chalk Ink; Other: Machine Stitching and Cardstock

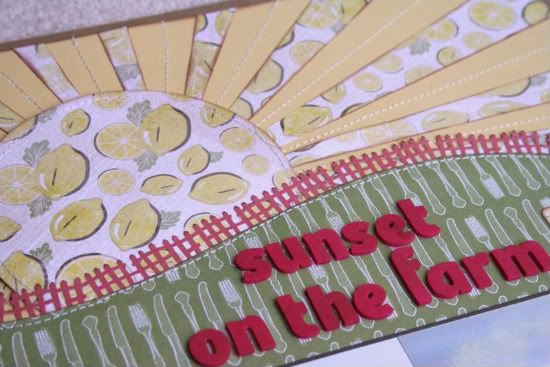
I loved the bright and cheery sun on this weeks sketch and knew right away I wanted to use it to make a layout about my parents farm. I had to adjust the circle. I used a 5" circle instead of the suggested 2" and then cut strips in random widths for the sun rays as shown on the sketch. I used yellow cardstock as my base and then attached the strips of the lemon paper on top. I then stitched between the sun rays on the cardstock and attached the sun to kraft paper.

I hand cut the green curve using a template I made earlier this year based on a previous sketch by Allison. I loved that sketch so much that I hid my curved template away for later use. I just love circles and curves on layouts.


I then tucked in my red fence border. To get the fence to curve, I simply snipped the bottom of the border and bent it gently. I held the fence in place by using my sewing machine to stitch around the green patterned paper.

Journaling reads: "It's so nice to be at my parents farm at sunset. Jackson and Mawmaw enjoyed looking at the cows and the other boys enjoyed running around in the barn. Fall 2010"

 • • • • • • • • • • • • • • • • • • • • • • • • • • • • • •


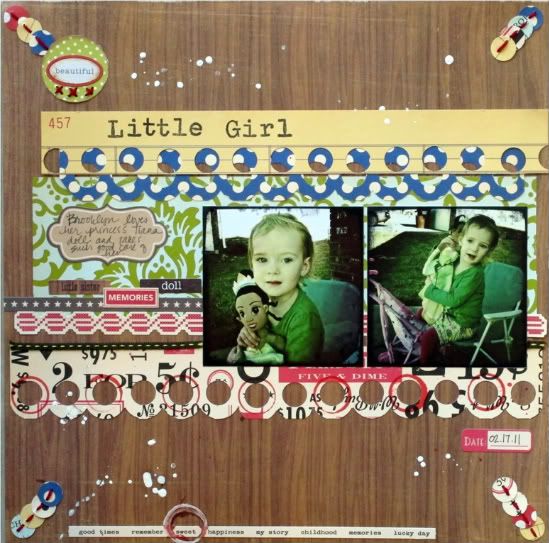
"Beautiful Little Girl" by Christy Arthur
Products - Crate Paper: Emma's Shoppe Phrase Stickers, Playhouse, Accent Cuts, Word Stickers - Toy Box Trims; October Afternoon: 5&Dime Shape Stickers, Root Beer Barrels, Bubble Gum, Circus Peanuts, Butterscotch, Label Stickers, Word Stickers and Miscellany; Echo Park: For the Record Table Cloth; Hero Arts: Typewriter Stamps; Studio Calico: Mister Huey Calico White, Schoolhouse, PonyBazzill: In Stitch'z Red/Orange

I simplified the diagonals in the sketch for this layout. I used circles that are stitched together to form the diagonal lines that meet at the green circle in the top left corner.


I chose to keep the diagonals very simple for this layout. To make them more pronounced, I could have stitched all the way across the layout.


 • • • • • • • • • • • • • • • • • • • • • • • • • • • • • •


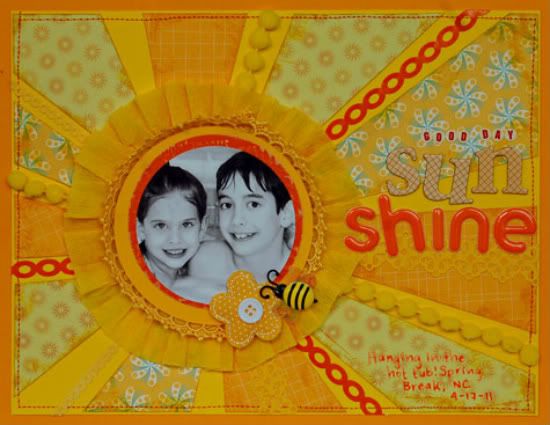
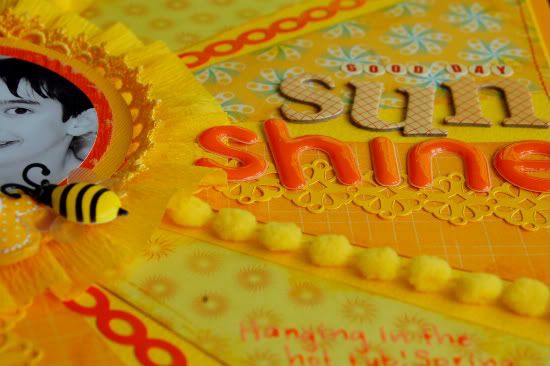
"Good Day Sunshine" by Suzanna Lee
Supplies - Cardstock: Bazzill, Coredinations; Patterned Paper: Cosmo Cricket, Best Creations, Bo Bunny; Paper Ribbon/Frills: Oriental Trading, Doodlebug, K & Co; Ribbon: Recollections, Doodlebug; Puffie: KI Memories; Dimensional Sticker: Jolee's; Letter Stickers: American Crafts, Jenni Bowlin; Ink: Ranger Distress Ink; Misc: crepe paper

The most obvious variation here is that I made an 8.5 x 11 layout instead of a card. I scanned in Allison's sketch and enlarged it in PhotoShop so that I had templates from which to cut the pieces of paper. I chose not to use the clouds as they detracted from the tone on tone feel I wanted to create for my layout. I also added a few extra circles as the sun center.


 • • • • • • • • • • • • • • • • • • • • • • • • • • • • • •

Bonus Sketch
One-page Sketch #6 - based on Card Sketch #6

You can download and print this sketch by clicking on the one-page sketches link found under the "printable sketches" tab on the right sidebar.

Each Friday in May, in celebration of National Scrapbook Day, I'll be sharing bonus sketches. All of the bonus sketches are based on the sketch for that week. Today the one-page bonus sketch is based on the sunshine card sketch. 

•••••••••••••••••••••••••••••••


Sunday, April 24, 2011

One-Page Sketch #5

••••••••••••••••••••••••••••••••••••••••••


You can download and print this sketch by clicking on the one-page sketches link found under the "printable sketches" tab on the right sidebar.

I hope every had a very Happy Easter!

One-page Sketch #5 is perfect for those Easter pictures with a Springy feel to the sketch! (We had a day of downpours so the umbrella add-on sketch from last week might find it's way onto my Easter pages.) If you want to use it for something non-Spring just replace the flowers with another elements like hearts, stars, circles, etc.

This sketch has possibilities for different photo sizes and switching the orientation of the photos. Here are a few you can try:

• Add another 5 x 3 photo to have a column of three photos and adjust the paper to fit the extra.
• Use a vertical 5 x 7 or 4 x 6 in place of the two photos.
• Split one of the smaller pictures into two 2 1/5 x 3 photos, perfect for wallet size.

We've got a week full of great projects based on this sketch to share so check back tomorrow! There's also still time to get in on the Unibind PhotoBook Creator giveaway from Friday!
•••••••••••••••••••••••••••••••••••

Sunday, March 20, 2011

One-Page Sketch #4

••••••••••••••••••••••••••••


You can download and print this sketch by clicking on the one-page sketches link found under the "printable sketches" tab on the right sidebar.

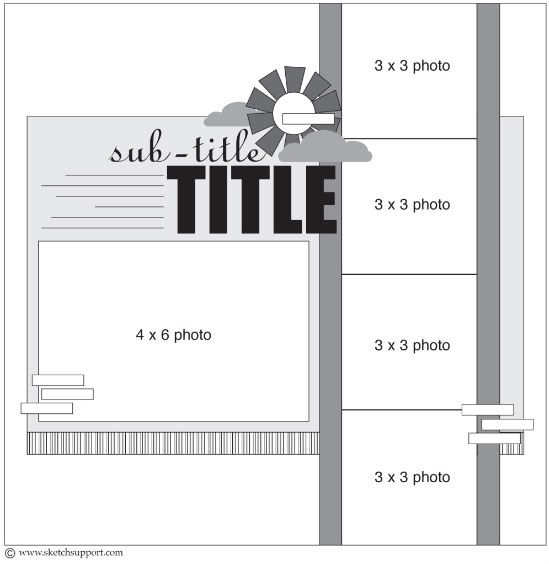
With the colder weather behind us, as least it's looking that way around here, this sketch is a great way to welcome Spring today! If you use the sketch as it is, it's perfect for photos of kids playing in the backyard, beautiful Spring flowers, or a page about what makes you happy. Of course, you can always customize the sketch to fit the theme of your layout with different elements in place of the sun and clouds.

You can also play around with the photo sizes to fit the pictures you want to use. For the column of 3 x 3" photos you have lots of options like:

• two 3 x 6" photos
• five 2 x 2" photos
• three 4 x 4" photos (you'll probably have to make a few adjustments to fit the extra inch. I would recommend extending the background rectangle to the edges of the page and maybe using 1/4" vertical strips instead of 1/2" strips.)
• ten 2 x 2" photos (I would follow the same suggestions for the three 4 x 4" photos)

For the 6 x 4" photo, you can adjust it to fit your pictures as well. If you wanted to include more journaling than the space on the sketch provides you could always flip the 6 x 4" to a 4 x 6" and the journaling can continue down to the left of the photo.

The one-page sketch fun starts tomorrow so be sure to come back and see all the amazing ways the creative team has put this sketch to use.

Happy first day of Spring!
•••••••••••••••••••••••••••••••••••

Sunday, February 20, 2011

One-Page Sketch #3 and the Two-page Product Challenge Winner

••••••••••••••••••••••••••••••••••••••

You can download and print this sketch by clicking on the one-page sketches link found under the "printable sketches" tab on the right sidebar.

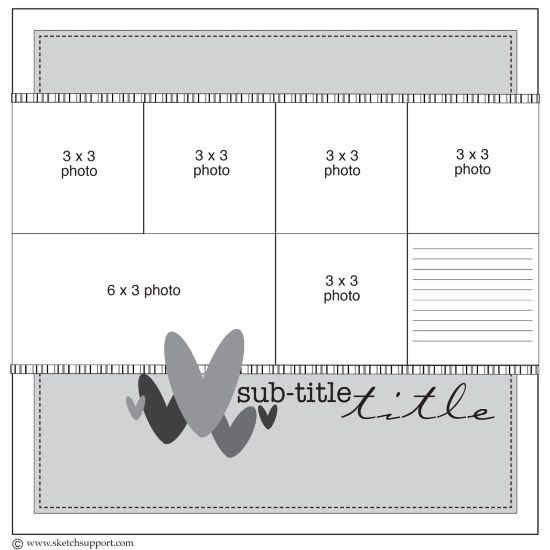
One-page layouts don't necessarily limit the number of photos you can use. You most often have to use smaller sizes but you can still get a lot of photos on one page. 

This month, the one-page sketch has six photos: one larger photo (6" x 3") and five smaller photos (3" x 3").  Sketches with all the photos in one big block are the easiest to adjust to fit the photo sizes you want to use. There are so many combinations of photo sizes you could use that I bet you couldn't even begin to count how many. Here are a few that would work:

• seven 3" x 3" photos
• two 4" x 6", one 4" x 4", and a 4" x 2" journaling block
• three 4" x 6" photos without a journaling block
• three 6" x 3" photos and a 3" x 6" journaling block
• three 6" x 3", one 3" x 3", and a 3" x 3" journaling block

This is also a great sketch for using up some scraps. You don't have to use a 11" x 11" square for the background like the sketch suggests. You could instead use two separate strips, one for the top and one for the bottom, and save some paper since it would be hidden behind the pictures and journaling. 

The week we've got several great variations based on the sketch to share and on Friday we've got another round of the Jillibean Soup Product Challenge. Check back tomorrow for the first round of layouts based on One-page Sketch #3!

• • • • • • • • • • • • • • • • • • • • • • • • • • • • • • • • • • • • • • • • • • • • •
••••••••••••••••••••••••••
Two-page Sketch/Jillibean Soup Product Challenge Winner 
••••••••••••••••••••••
Thank you to everyone who entered the product challenge. There were so many great layouts to look at! If you get a chance, click here to find all the links and go check them out yourself. I had so much fun hopping around to each one and seeing all the unique layouts. You all really did an amazing job with the sketch and I wish it was possible to give a prize to each one of you! 
••••••••••••••••••••••••••
The winner of the challenge is: 
•••••••••••••••••••••••••• 
 ••••••••••••••••••••••••••
Sue Bone said...
Here's the layout I did at our local crop today with this month's double layout and the prescribed items.

Congrats Sue! Your layout is a fantastic variation of the sketch! You can email me at allison@scrapbookgeneration.com with your shipping information and we'll get that Jillibean Soup prize package headed your way.
••••••••••••••••••••••••••••••••

Sunday, January 23, 2011

One-Page Sketch #2

 •••••••••••••••••••••••••••••••••••
I'm so very excited to reveal the January one-page sketch. Just like the add-on sketches, these are something new to us.


You can download and print this sketch by clicking on the one-page sketches link found under the "printable sketches" tab on the right sidebar.

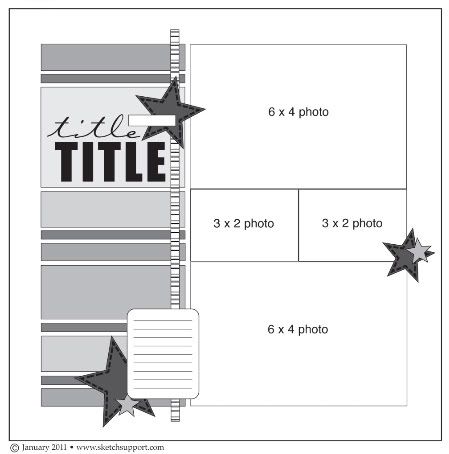
With several different sized strips on the left and the four photos on the right, this sketch has lots of possibilities.

The photo block should be very easy to adapt to fit the photos you want to use. There are tons of photo size combinations you can use to get the same 6" x 10" block of photos without having to adjust the sketch to fit them. I always look at photo blocks as a puzzle to figure out. Usually it is easier to start with the largest one or two and then build around them with smaller photos.

The strips are great for playing around with your creativity and adding your own style and finishing touches. Like the photos, you could use so many different combinations of sizes or maybe strips of all the same size or even one big block of paper. And the strips are perfect for pulling out those scraps and putting them to good use.

This week we'll show you lots of layouts based on this sketch from our creative team and we've also got some fantastic giveaways from American Crafts and My Mind's Eye (trust me you won't want to miss those!) Check back tomorrow for the beginning of our one-page week of fun!
•••••••••••••••••••••••••••••••••••